Friday, 10 January 2020

Data entities in D365

A data entity in D365 is an abstraction from the physical implementation of database tables. For example, in normalized tables, a lot of the data for each customer might be stored in a customer table, and then the rest might be spread across a small set of related tables. In this case, the data entity for the customer concept appears as one de-normalized view, in which each row contains all the data from the customer table and its related tables.


Data Entity Categories


Parameter
Functional or behavioral parameters. Required to set up a deployment or a module for a specific build or customer. Can include data that is specific to an industry or business. The data can also apply to broader set of customers. Tables that contain only one record, where the columns are values for settings. Examples of such tables exist for Account payable (AP), General ledger (GL), client performance options, workflows, and so on.

Reference
Simple reference data, of small quantity, that is required to operate a business process.
Data that is specific to an industry or a business process. Examples include units, dimensions, and tax codes.

Master
Data assets of the business. Generally, these are the “nouns” of the business, which typically fall into categories such as people, places, and concepts. Complex reference data, of large quantity. Examples include customers, vendors, and projects.

Document
Worksheet data that is converted into transactions later. Documents that have complex structures, such a several line items for each header record. Examples include sales orders, purchase orders, open balances, and journals.

Transaction
The operational transaction data of the business. Posted transactions. These are non‑idempotent items such as posted invoiced and balances. Typically, these items are excluded during a full dataset copy. Examples include pending invoices.

Data Entity Use Cases


Synchronous service (OData)
Data entities enable public application programming interfaces (APIs) on entities to be exposed, which enables synchronous services. Synchronous services are used for the following purposes:
• Office integration
• Third-party mobile apps

Asynchronous integration
Data entities also support asynchronous integration through a data management pipeline. This enables asynchronous and high-performing data insertion and extraction scenarios. Here are some examples:
• Interactive file-based import/export
• Recurring integrations (file, queue, and so on)

Thursday, 9 January 2020

Upgrade Dynamics AX 4.0/AX 2009 to Dynamics AX 2012

Setup source Environment

  
1.      Import the PreProcessing (databaseupgrade\xpo\UpgradeAX5.xpo) XPO, located in the installation CD folder and Un check "Import with ID values:"
2.      Open the PreProcessing Checklist "SysCheckList_PreUpgrade50" located in the AX50PreUpgradeFramework project.
3.      The Preprocessing Checklist appears, if your checklists has this @ABC123 instead of text, and then do this to get the missing label file. To apply the new label files in your AX4/5 machine (if you are working with preprocessing framework):
·         Copy the label file to the label folder in your AX4/2009 machine
·         Restart the AOS
·         Label folder in AX4/2009 is a sub folder under ...\Application\Appl\ where you can find *.ald files in it.
4.      Run through the PreProcessing Checklist Items to prepare the database for Upgrade
·         If upgrading AX 2009, and the upgrade scripts don't run after opening the cockpit, jump to step #12 and follow the steps there to setup the batch server (AX4 does not require setting up a batch server). Then come back to this point and continue.
·         If upgrading AX4, You need to compile the ReleaseUpdate* classes and the ReleaseUpdateCockpit form.
·         If upgrading AX4, when running the cockpit run multiple instances of AX4:
o   Start the new Microsoft Dynamics AX client.
o   Select Basic > Periodic > Batch > Processing.
o   A batch dialog appears.
o   Add DataUpgrade in the Group field, and click OK.
5.      In the Inventory Dimension Group Upgrade checklist Item, click on the “Map dimension groups 1:1” button (Do not click on the “Assign identical groups” button) and then click on the “Set to Ready For Upgrade” button.
6.      In the System Parameters checklist Item, select “en-us” as the default language and click on the “Set to Ready for Upgrade” button.
7.      In the Company Priority setup, click on the “Set to Ready for Upgrade” button.
8.      In the Product Upgrade Form, click on the Synchronize button and then on the Product Mapping -> Map all items 1:1. Click on the “Set to Ready for Upgrade” button after doing these steps.
9.      In the Units form, click on the “Automatically assignment” button.
a.       Set all decimals to 2
b.      Set all Unit classes to “Length”
c.       Click on the “Validate” button to make sure no errors are found
d.      Click on the “Set to Ready for Upgrade” button.
10.  In the Pre-Upgrade of Unit Conversions checklist item click on the Validate button and then on the “Set to Ready for Upgrade” button.
11.  In the Pre-Upgrade of Unit Texts click on the Validate button and then on the “Set to Ready for Upgrade” button.
12.  In the Pre-Upgrade Data checklist item you might need to configure the Batch Server and Batch Server Groups if the Live PreProcessing scripts don’t start running. In order to do so, go to Administration\Setup\Server Configuration
13.  Make sure that only the machine you are using has the Is Batch Server checkbox checked. Now go to the Batch Server Groups tab and select the DataUpdate Batch Server Group
14.  Another configuration that is required to start running these jobs is the Batch Group form. You can access this in Administration\Setup\Batch Groups
15.  Select the DataUpdate Batch Group and go to the Batch Servers tab.
16.  Make sure the machine you’re running the upgrade on is on the Selected Servers list on the left side pane.
17.  After running the Live PreUpgrade, continue with the next checklist items (Validate Pre Upgrade, check Single User Mode and Single User Mode Upgrade)
18.  Once the checklist is finished, the PreProcessing stage is done. Uninstall AX50 (don’t drop the database) and you are ready to go to the AX6 steps.

Starting an Upgrade from the Target Environment

1.      Install Dynamics AX 2012.
2.      Setup Ax 2012 pointing the AOS to a new Database . Specify a different database name for the Model Database. Make sure you select the "Register Database for Upgrade checkbox:"
3.      At this stage, you should have 3 databases in your system: Database
·         The AX50 PreProcessed database
·         The new AX6 database
·         The new AX2012 model database
4.      Start AX 2012 and run through the Upgrade checklist
5.      In the Provide License Information step, specify the license.
6.      At this point, the Target Environment upgrade process is started. Make your way through the first five checklist items.

Data Upgrade Stages

Source DB connection step:
In the Source DB connection step, specify the server name where the Source Database is located and the Source Database name. Click OK once this information is entered.
PreSynchronize step:
This step loads the Upgrade cockpit. Depending on which stage you started the Upgrade Process; you might need to configure the Batch Groups and Batch Servers. Once this configuration is set, click the Run button. PreSync scripts should start running at this stage.
Create Tables Step:
This step synchronizes the database. No special steps need to be taken here.
Generate table and field mapping:
This step generates table and field mapping between source and target systems. There should be no mapping with error.
Generate Bulk Copy and Script Prioritization Step:
Bulk Copy Priorities and Script-Table dependencies are resolved in this step. No special steps need to be taken here.
Launch Data Upgrade Step:
This step loads the Upgrade cockpit. Once the cockpit is loaded, click on the Run button and the Post Sync scripts should start running.
This is where the data is actually copied from the Source Database to the Target Database based on the Mappings found in the Generate Table and Field Mapping step.

Tuesday, 7 January 2020

D365 Add a new custom Field In Standard or Base Data Entity

There are many data entities available in dynamics D365 Finance & Operations (Example: EcoResReleasedProductV2Entity, InventWarehouseEntity).Requirement of updating or inserting values in custom field of standard table by extending standard or base Data Entity are very common.The purpose of this post is Adding  a new custom Field In Standard or Base Data Entity (Example: EcoResReleasedProductV2Entity, InventWarehouseEntity).
Requirement
A new custom field needs to be created on InventLocation Table.The same field has to be added in base or standard data entity InventWarehouseEntity.User will be able to update the value of custom field value in InventLocationTable by using base or standard data entity InventWarehouseEntity.
Steps
  1. Create a new field in extension of table InventLocation.Untitled
  2. Add the new custom field created in Step 1 into the extension of data entity InventWarehouseEntity.Untitled
  3. Add the new custom field created in Step 1 into the extension of staging table data entity InventWarehouseEntity.Untitled
  4. Refresh Entity 

Monday, 6 January 2020

BYOD (Bring your own database) D365FO


What is BYOD?
The BYOD feature was released in Microsoft Dynamics 365 with platform update 2 (August 2016)
BYOD feature lets administrators configure their own database, and then export one or more data entities that are available in Finance and Operations into it.
The BYOD feature allows you to push data into a database that you manage on Azure or on premises.
This is done with the use of data entities. This means you can use existing entities or build your own entities to structure the data how you need for your external database. As per MSFT, Currently more than 1700 Data entities are available.

Objective 
You have data in D365 running in the cloud but you still have other applications that you run on premise or somewhere else. 

So you need to get data from D365 into a another environment so other applications can use the data. 

The most common use of BYOD is for data analysis and long running reporting (Long running reports are pain point of AX)


Prerequisite

First Create a database on Azure SQL or on premise SQL (You need static IP for connection)

How to create Database on Azure..

Log in to the Azure portal


Follow these steps to create a blank SQL database.
  1. Click Create a resource in the upper left-hand corner of the Azure portal.
  2. On the New page, select Databases in the Azure Marketplace section, and then click SQL Database in the Featured section.


Fill out the below fields.


Click on server to configure server for you newly created database a pop will appear fill the required information 


Once database created on SQL or AZURE Then Login to D365 to configure data source of Newly created database. for Azure database detail please follow the this link


AX Data source Configuration..


 Go to Systems Administrations > Workspace > Data management 

Click on > Configure Data Source and click on New


Now fill the data source name and description and select the type Azure SQL DB..
Please check the below screenshot.


Now Go back to Systems Administrations > Workspace > Data management 

Click on > Configure Entity Export to database


Now, click on EDIT button to Edit the newly  created data source..
Enter Azure SQL / SQL connection string and click on validate 


Then enter the connection string of the Azure DB.
It should be in the format:
Data Source={azure.database.windows.net},1433;Initial Catalog={database};Integrated Security=False;User ID={userid};Password={password}
Configuration of data source is completed.

Now Go back to Systems Administrations > Workspace > Data management 

Click on > Data Entities
If Entities are not showing then go back to Systems Administrations > Workspace > Data management and click on framework parameters and refersh the entities 


After 2 or 3 minutes all entities will appear to your Data Entities List page.
Now select the required Entity which you want to export. 

Enable the change tracking for incremental Export.


Once Change Tracking Enable on Entity click on Publish then select your data source where you want to publish and click on publish 


A Job Will schedule like below screenshot 
Message will appear once job complete and a table will be created to targeted DB.

Now Go back to Systems Administrations > Workspace > Data management 

Click on > Export Data 

Please make sure you always use Enhance View for Import and Export


Now fill the required fields Like Name and Select Target data format to your Data source, Default refresh type should be incremental then click on Add 


Once you fill all the required fields, You are ready to export :) Make sure you are exporting the data in batch for better performance.


After completion of data export you can verify on your targeted data source Like below screenshot


Extensible Data Security (XDS) Role Base Security 2012 & D365FO

Extensible Data Security (XDS)  Role Base Security  2012 & D365FO

Overview


The Extensible Data Security policy framework is the Application Foundation framework provided by Microsoft Dynamics AX 2012 (new feature) in addition to the role-based security in order to secure the data.
Dynamics AX Admins and developers can use the security policies to block access to specific rows in a table. In the AOT, policies can be found under node Security > Policies.
XDS policy can be utilized for setting security privileges on the global address book.


Model of Extensible Data Security ( Source Link)


XDS concepts


Primary Table

A primary table is any table that will be used to restrict data in the constrained table. It is the table that is specified in the policy query.

Constrained Table

A constrained table is a table on which data filtering is applied. It can be a primary table or a table that is related to the primary table.

Policy Query

Policy query helps to secure data in the constrained table defined in the XDS. It is used to fetch data from the primary table, which is then used to restrict data in the constrained table.

Context

Context is the most import part of XDS without which security policy will not be applied. It defines the context on which security policy will be applied. It can have three possible values:
  1. ContextString: Defines a specific application context on which security policy will be enabled. It is also called an application context.
  2. RoleName: Defines that the security policy will only be applied to a particular Role in the application.
  3. RoleProperty: Used to define multiple Roles for a single security policy.


Important
  • Role Base security will remain same for AX 2012 & D365FO
  • In this blog we will focus with RoleName Context.


Lets Begin!

In this demo we are Implementing XDS on Purchase Order and restricting with warehouse. Initially we will implement XDS with static Warehouse range.

As part of this tutorial, security policy will be applied to the XDS Purchse Order Security Role role


Steps

  1. First, create a new Policy query. Open AOT Queries
  1. Right click on Project and create a new Query XDS_PurchaseOrder


3.  Open Query Add New Data-Source Purch Table
4.  Set Dynamic Fields No and Manually Select One Field PurchID to Make sure performance will not hurt with you implementation.
5.  Add Range and select InventLocationId and set value properties. In my Case i have set the value 9221122W.


6. Save the query  (In Next Blog We will work with dynamic Range which user can control from UI Level)
7. Now next step is to create security Role
8. Right click on Project and create a new Role XDS_PurchaseOrderSecurityRole


11. select security from side panel and create Security Role and set the role proprieties Like below screenshot. 

Important 
No privilege required 


12.  Now next step is to create security Policy 
13. Right click on Project and create a new security Policy SLD_TransferOrderSecurityPolicy


14. select security from side panel and create Security policy.


15 set the security policy like below screen shot.


Now Build The Model and Sync Database if you are working on D365 and reset the IIS..

Go to Systems Administrator > Users Form and assign newly created Role to any user, To whom you want to perform testing..


Enjoy.... :)

Important
XDS security will not work if user have Systems Administrator role. 

Example: 2

I’m going to use the example of wanting to secure the SalesOrder table based on the customer group.

  • Constrained table – is the table(s) given a security policy from which data is filtered or secured, based on the associated policy query. In the above example, the SalesOrder table would be the constrained table.
  • Primary table – is used to secure the content of the related constrained table. In the above example, the CustTable would be the primary table. The primary table must have an explicit relationship to the constrained table.
  • Policy query – the query used to secure the constrained table contents via the primary table contents
  • Context – the piece of information that controls the circumstances that a given policy is applicable. Contexts have two categories:
    • Role Context – enables a policy based on the role(s) the user is assigned
    • Application Context – enables a policy based on information set by the application

Developing an Extensible Data Security Policy

Before you begin developing XDS policies there are a couple things understand/keep in mind:

  • Understand the scenario requirement/use case of why you are using XDS
  • Identify the constrained and primary tables and analyze the relationships between them
  • Analyze the data access patterns, table size/record counts, and existing indexes of the constrained and primary tables

Demo Scenario

If we take the scenario that we want to limit the customers a particular user sees based on a specific customer group, how would we set that up?

  1. The first thing to do is to determine your Constraint and Primary tables, in this case the CustTable table is our constraint table and the CustGroup table is our primary table.
  2. Next we create the policy query around our CustGroup, we want this query to return the results that we want to restrict the constraint table with
    • Create a new Query, set the data source of the query to the primary table and then perform any filtering or other joins that need to be done for this query to return the results you want to filter by
    • In our case we are limiting the user to only be able to see customers that have a CustGroup of ’10’ and Name of ‘Major Customers’
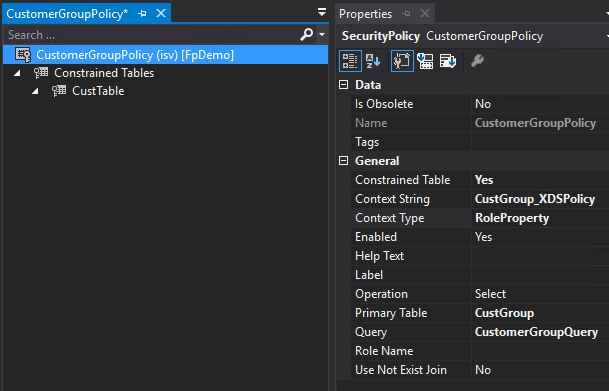
  3. Now we can create our Security Policy, we set the following parameters
    • Constrained Table to Yes
    • Primary Table to CustGroup
    • Query to the name of the query we created in step 2
    • If we want this to be applied to a specific role we can set this in the Role Name field, if you leave this blank it gets applied across all roles in your environment
  4. We then add a constrained table to the policy, in our case CustTable and set the following parameters
    • Name field is the constrained table, CustTable
    • Table Relation is the primary table, CustGroup
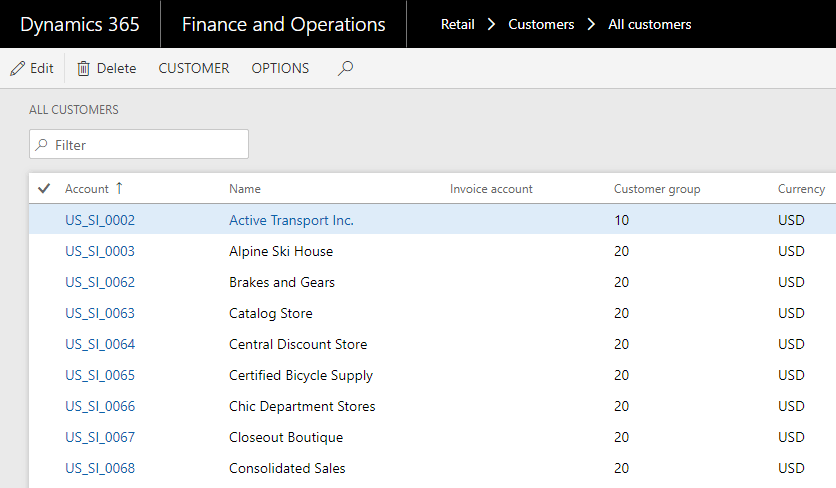
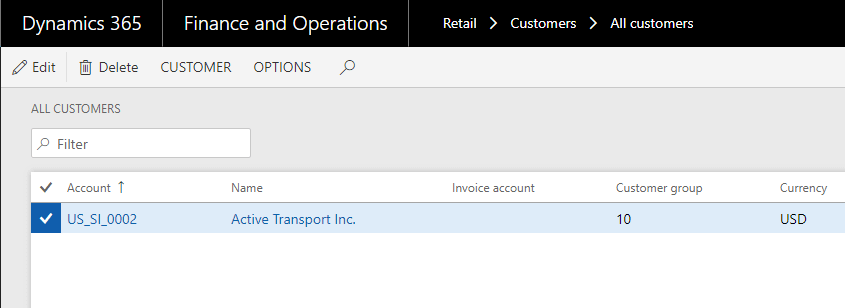
  5. Now if we build the solution and do a database sync of our project our XDS policy becomes live, to show what this does I did a before and after using a user assigned the FpTestRole to show the affect of the XDS policy

User access without XDS policy applied

User access after applying XDS policy

Now one question I had is, how do you apply an XDS policy against a group of roles? Well this is where the Context Type and Context String parameter on the policy comes into play. The Context Type parameter determines how the Context String parameter is handled. The Context Type has 3 different values:

  • ContextString – should be set if you want to change the value of the Context String parameter via X++ code (via the XDS::SetContext method)
  • RoleName – should be set if you want this policy to be assigned to a single role, this has the same effect as setting the Role Name field
  • RoleProperty – allows for applying the policy to multiple roles via the Context String value, if a role has the same Context String then that role will have the XDS policy applied

If we set the Context Type to RoleProperty, then any role with a context string of the value we input in the Context String parameter will be assigned the XDS policy. So if we set the Context String value as CustGroup_XDSPolicy,

and then we set the same Context String value on a role, any user assigned that role will have the XDS policy applied to them.

Ensuring Efficient XDS Policies

Using XDS within D365FO will have an impact on the performance of queries on a table, the goal is to minimize this impact. There a couple things to keep in mind:

  • Follow standard best practices of developing SQL queries (using indexes on join conditions, correct primary keys, etc)
  • Simplify queries as much as possible, don’t have unnecessary joins

How to Debug/Troubleshoot Issues

If while using XDS you come across an instance where a user has more or less rows from a constrained table than you think they should you will have to try and debug the XDS policy. There are two ways of doing that:

  • Execute a snippet of X++ code to see the SQL statement generated for a particular XDS policy (an example of this can be found in the white paper resource link below)
  • Run a SELECT statement against the ModelSecPolRuntimeEx table to see the human readable query stored for this XDS policy
    • For example, if we look for the CustomerGroupPolicy from the example above in the table the ModeledQueryDebugInfo column shows the SQL query

Another issue that you may see is a performance impact once XDS policies have been applied. In this case you will need to review the simplicity of your queries, the indexes on your tables, the proper joins are being used, and take into account the number of rows within each table you are using.


POSTMAN D365

  Postman is useful to test the behavior of different OData class from/to D365FO. In this post we will see the steps to setup Postman with D...