Thursday 6 October 2016

Upgrade Process


Upgrade Process

Following are the steps in order to upgrade AX 2009 to 2012


Preprocessing upgrade checklist
   
AOD code upgrade checklist
   
Model code upgrade checklist
   
Data upgrade checklist
  Source System steps:
Prerequisite  Steps

1.Verify that you have the proper amount of space on your source and target system hard drive and in your database transaction log.
2. Ensure that Microsoft SQL Server is configured for the highest possible performance and throughput.
3. Clean up Data
4. Activate multisite functionality for each and every company when you upgrade from Microsoft Dynamics AX 2009 to Microsoft Dynamics AX 2012 before installing Upgrade  XPO . (For activate follow the path Administration  > Setup ->System > Multisite activation) 
5. Trade and Logistics licenses after you upgrade if configuration key enabled for source system.
6. Before you upgrade, if you are using virtual companies you must make the following changes to their configuration:  Make sure that the inventory dimensions table is not shared.  Make sure that tables that contain inventory dimension fields are not shared.
7.You will import the preprocessing XPO into the USR layer on the Microsoft Dynamics AX source system.
8. Be sure to back up your application files (*.aod) and label files (*.ald) before you import the preprocessing XPO
9. It is advisable to make sure that the Application Object Directory (AOD) is synchronized with the Microsoft Dynamics AX database schema before you begin to import of the XPO.
10.Install ALD files which are in DatabaseUpgrade\ALD path to C:\Program Files\Microsoft Dynamics AX\50\Application\Appl\Standard\ (Stop services before copy ALD file)
11.Import XPOs which  are in DatabaseUpgrade\XPO path(clear with id check box option at the time of import)
Prerequisite Steps for Target System
1.  Create a folder with name Old which is used to store AOD files in AX 2012in the folowing location %programFiles%\Microsoft DynamicsAX\60\Server\<AOSInstance Name>\bin\Application\Appl\standard
2. Copy all the AOD files in Old folder even for Microsoft Layer
3.If you have customized in folowing layer than rename with new one
      axbup.aod->axisp.aod,axbus.aod->axisv.aod,axsl3.aod->axslp.aod,axsl2.aod->axsln.aod,
axsl1.aod->axfpp.aod,axhfx.aod->axfpk.aod


Steps on Target System:

1. Open check list and path is /System Administrator/Setup/Code Upgrade check list


AOD code upgrade check list redio button is used for upgrade from AX 4.0 or AX 2009 to AX 2012 and Model code upgrade check list is used when source and target both are in AX 2012
2. Once click on ok it redirected to folowing check list


3. For compliting above check list we have to complete following steps
4. Click on Import Microsoft AOD files into the base line model store and import AOD files starting form lower layers(from SYS) to upper layer one by one
5. Click on Import AOD files into base line model store and select lowest layerfirst which you want to upgrade


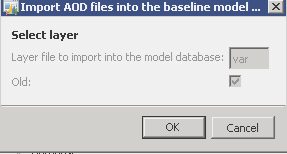
       6.Copy AOD files that you want to upgrade in the folowing location
          %ProgramFiles%\Microsoft Dynamics AX\60\Server\<AOS instance name>\bin\Application\Appl\Standard
Note:Do not copy Microsoft layers AOD in above locationand follow layer rename convention if you customized in the layer which does not exist in target system as discussed above in prerequisite for target system
7.Click on import AOD files into new model stores(make sure that model did not create already otherwise you have to delete model first then import model which you want to upgrate )
8.if you have't object in user layer then don't import user model since it hase all xpo in it .


 9.Restart AOS after importing each model
10. Import label files
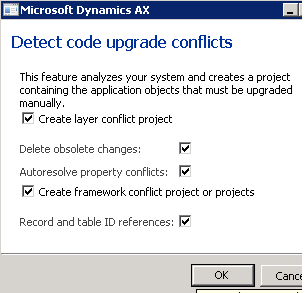
11.Click on Detect code upgrade conflicts on check list and checked check box Record and table ID referencdes as shown in folowing figure


Note: How to untall a model
 A. open command promt and navigate directory %ProgramFiles%\Microsoft Dynamics AX\60\ManagementUtilities
 B. Type  axutil delete /model:<name>
 C. Press enter
Start Preprocessing check list

You install the framework for the Preprocessing upgrade checklist in the USR layer of the Microsoft Dynamics AX source system by importing an XPO file.

To start checklist Expand Shared Project and locate Ax50PreUpgradeFramework,  Right-click it, and click Open.
and run menu item SysCheckList_PreUpgrade50

Process flow to Execute check list on source System


1.      Prepare for upgrade
Check upgrade readiness
 View and fix upgrade readiness issues
Initialize preprocessing)

                 
2.      Prepare application data for preprocessing

System parameters
 Set up number sequence for upgrade
 Company priority setup
 Update country/region codes
 Map country/region codes
 Default country/region
 Prepare financial dimension framework for upgrade
 Map fixed asset calendars
 Prepare currencies for upgrade
 Inventory dimension group upgrade
 Product upgrade (preprocessing)
 Configure site structure
 Map task groups to capabilities
 Product Builder Route
 nodes upgrade 
 Units
 Unit conversions
 Fixed units
 Unit texts
 About purchase order upgrade
 User relations upgrade - invalid company users
 User relations upgrade missing contact person
 User relations upgrade duplicate user IDs
Select which employee number to upgrade

     
     3. Preprocess data on live system
 Run live preprocessing scripts
 Country/region upgrade
 Party upgrade
 Run delta preprocessing scripts

                        
4.      Preprocess data in single-user mode

Enter into single-user mode
 Run single-user mode preprocessing scripts

Installation of AX

1- Open the Dynamics AX Media the double click the autorun.exe


2- when the Installer windows appear click the"Validate system requirements" to make sure that all prerequisites was installed.

3-Select the components that you attend to install. in our case we are going to select the Database, Application Object Server(AOS), and the client Component. then press the Validate Button.


4- Make sure that there is no errors then Click Finish. if any error appears you must fix it before continue.

5- Go back to the Installer main windows and click "Microsoft Dynamics AX Components".

6- Press next in the welcome screen.

7- In the license screen select "I Accept the license terms" then press Next Button.  

8- in the Customer Experience screen i am going to select "I Don't want to join the program at this time" then click next.

9- Select file location then click next.

10- Click Install.

11- Wait until the Dynamics AX setup support files has been installed.

12- In the installation screen Select "Microsoft Dynamics AX" then click next.

13- In the installation type screen Select "Custom Installation" then click next.

14- Now Select the Database Component alone. then click next.

15- in the Prerequisite validation screen make sure that everything is ok then click Next.

16- then Select Create New Databases option then click next.

17- in the database information you can change the databases names or you can accept the default values. when you finish click next.

18- in the select additional models make sure to check the foundation Model then click next.

19- The "Prerequisite validation screen" will popped again. make sure that everything is OK then click Next.

20- Click Install.

21- Click Finish.

22- Check the log to make sure that the database was installed successfully.

23- Now Repeat steps 5 and 6.
24- In the installation screen Select "Microsoft Dynamics AX" then click next.

25- In the installation type screen Select "Custom Installation" then click next.

26- Now Select the Application Object Server(AOS), Client Complainants then click next.

27- The "Prerequisite validation screen" will popped again. make sure that everything is OK then click Next.

28- Select file location then click next.

29- In the "Connect to the databases" Screen select the server name, The databases names then click Next.

30- Leave the port information as is. then click Next.


31- Specify the AOS Account. in our case we are going to select Domain Account then click next.

32- Warring of using the user account will appear. Click OK.

33- Select the Client preferences then Click Next.

34-The "Prerequisite validation screen" will popped again. make sure that everything is OK then click Next.

35-Click Install.

36-Wait Until the installation process completed. then click Finish Button.

37-Check the log to make sure that tall components was installed successfully.

38- Restart the windows then run AX.

39-Congratulation AX was installed successfully. In next article we are going to illustrate how to complete the initialization checklist. 


List of Classes and Tables used for Module

Sales & Purchase  Classes & Tables

SalesOrder Classes:

  • SalesTableType and SaleslineType classes will get called while creating the SalesOrders.
SalesFormLetter_Confirm,
SalesFormLetter_Invoice,
SalesFormLetter_PackingSlip,
SalesFormLetter_PickingLlst,
classes will be used to post the sales order at various document status (packing, invoice etc).

SalesOrder Tables:

  • SalesTable : Contains all SalesOrder headers regardless whether they have been posted or not.
  • SalesParmTable &SalesParmLine : Contains detailed information regarding posting sales headers and Lines.
  • CustConfirmJour,CustConfirmTrans: Contains all Sales Confirmation headers and Lines posted in Dynamic Ax originating from Sales Orders and Lines.
  • CustInvoiceJour &CustInvoiceTrans : Contains all sales all Sales Invoice headers and Lines posted in Dynamic Ax originating from Sales Orders and Lines.
  • CustPackingSlipJour,CustPackingSlipTrans:Contains all Sales PackingSlip headers and Lines posted in Dynamic Ax originating from Sales Orders and Lines.

PurchaseOrder Classes :

  • PurchTableType and PurchTableLine classes will get called while creating the PurchaseOrders.

PurchFormLetter_PurchOrder,
PurchFormLetter_ApproveJournal,
PurchFormLetter_Invoice,
PurchFormLetter_PackingSlip,
PurchFormLetter_ReceiptsList
classes will be used to post the PurchaseOrder at various document status (packing, invoice etc).

PurchaseOrder Tables :

  • PurchTable :contains all purchase order headers regardless whether they have been posted or not.
  • PurchParmTable,PurchParmLine:contains information regarding posting Purchase headers and Lines. 
  • VendPackingSlipJour,VendPackingSlipTrans tables contains posted packingslip headers and lines.
  • VendInvoiceJour & VendInvoiceTrans: tables contains all invoiced purchase order headers and Lines.
  • VendReceiptsJour & VendReceiptsTrans: tables contains posted receipt header and lines.
  • VendPurchOrderJour,VendPurchOrderTrans: contains Purchase requisition headers and lines.
  • Inventory Classes & Tables


    Inventory Classes :

    InventSum classes are used to find the on-hand information of a certain item at a certain date.

    InventOnHand class is used to find the current on-hand information.

    InventMovement class validates and prepares data that will be used to generate inventory transactions. All the classes related to the inventMovement class will be prefixed with InvMov

    InventUpdate classes are used to insert and update inventory transactions.Whenever a transaction should be posted, the updateNow()method in the correct InventUpdate subclass will execute. The super class in the hierarchy is the InventUpdate class, and the other classes in the hierarchy are prefixed ‘InventUpd_’.
    InventUpd_Estimated is triggered so that the inventory transactions will reflect that the item is on-order can is taken into consideration when the same item is ordered.


    Inventory Tables 

    Invent Dim : (Fields of invent DIM)
    1. InventColorId Item table contains information about colors.
    2. InventSizeId Item table contains information about item size.
    3. ConfigId  table contains information about available configuration of the various items.
    4. InventBatchId table contains information about batches.
    5. InventSerialId table contains information about item serial numbers.
    6. InventLocationId table contains information about warehouses.
    7. InventSiteId table contains information about sites.
    8. wmsLocationId table contains information about locations.
    9. wmsPalletId table contains information about pallets.
     InventTrans : parent table of all transactions. represents a flow of inventory transactions as data leaves and enters a company 

classes involved in Journal, Sales order Invoice, Purchase order invoice posting.

Journal Posting               : LedgerJournalCheckPost

Sales Order Posting        : SalesFormLetter, SalesFormLetter_Invoice

Purchase Order Posting : PurchFormLetter,

                                          PurchFormLetter_PurchOrder,

                                          PurchFormLetter_ReceiptList, 

                                          PurchFormLetter_PackingSlip, 

                                          PurchFormLetter_invoice.

Retail Statement Processing Details:
Statement posting is quite complex process, that includes the creation and posting of sales orders, payment journals, transferring of inventory transactions, etc.
Statement calculate classes:
  1. RetailStatementCalculate
Statement clear classes:
  1. RetailStatementClear
Statement posting classes:
  1. RetailStatementPost
  2. RetailStatementPostSalesOrders
  3. RetailStatementPaymentJournal
  4. RetailStatementSalesOrderCreator  
for Posting Retail Retailstorepicker, RetailPostingInvoiceJournal

Other Details

CustTrans -The CustTrans table contains posted transaction information for the customer. 
VendTrans -The VendTrans table contains posted transaction information for the vendor. 
CustSettlement– The CustSettlement table contains information relating to the settlement or reverse settlement of two transactions. They are used to link a transaction with the transaction it was settled against. 
VendSettlement– The VendSettlement table contains information relating to the settlement or reverse settlement of two transactions. They are used to link a transaction with the transaction it was settled against.
CustGroup – The CustGroup table contains a list of groups into which customers can be added. Every customer must specify a CustGroup with which it is associated.
VendGroup – The VendGroup table contains definitions of vendor groups.
CustTable – The CustTable table contains the list of customers for accounts receivable and customer relationship management.
VendTable – The VendTable table contains vendors for accounts payable.
SalesTable – The SalesTable table contains all sales order headers,
regardless of whether they have been posted or not.
PurchTable – The PurchTable table contains all purchase order headers, regardless of whether they have been posted or not.
SalesLine – The SalesLine table contains all sales order lines, regardless of whether they have been posted or not.
PurchLine – The PurchLine table contains all purchase order lines, regardless of whether they have been posted or not.
LedgerTable – The LedgerTable contains the definitions of the general
ledger accounts, also called the chart of accounts.
LedgerTrans – The LedgerTrans table contains the posted general ledger
transactions.
LedgerAccountCategory – The LedgerAccountCategory contains the financial categories that accounts fall into. The categories are assigned to accounts to allow easier grouping of accounts on financial statements.
Dimensions – The Dimensions table contains the dimension values for all of the defined dimensions. This is explained further later on.
LedgerTableInterval – The LedgerTableInterval table contains ranges of accounts associated with a Total ledger account.
LedgerBalancesTrans – The LedgerBalancesTrans table contains the posted ledger amounts per account and date.
LedgerBalancesDimTrans – The LedgerBalancesTrans table contains the posted ledger.


Thursday, September 10, 2015


List of important tables for Role Based Security in AX 2009 and AX 2012


AX 2009 Tables :-

UserGroupList :-
 The UserGroupList table contains the list of users associated with each user groups in Ax.

UserGroupInfo:- The UserGroupInfo table contains the list of available user groups in Ax.

UserInfo           :-The UserInfo table contains the list of users in Ax and their Active Directory information and default company information.

AccessRightsList Table :- Group rights

UtilIdElements :- The UtilIdElements table contains the application model shown in the AOT.

UtilElements :- The UtilElements table contains the application model shown in the AOT.

AX 2012 Tables :-

SecurityRole 
           :-The SecurityRole table reflects the list of roles defined by the security AOT role node.

SecurityUserRole    :-The SecurityUserRole table contains the user to role mappings.

SecurityTask           :-The SecurityTask table contains the list of duties and privileges that have been defined by the AOT security duty and security privilege nodes.

SecuritySubTask    :- The SecuritySubTask table contains the duty to privilege mappings that have been specified on the security duty AOT nodes.

SecurityRoleTaskGrant  :-The SecurityRoleTaskGrant table contains the list of role to duty mappings and role to privilege mappings as defined by the AOT security role node.

SecurityTaskEntryPoint :- The SecurityTaskEntryPoint table contains the list of privilege to entry point mappings that have been specified on the AOT security privilege node.

OMUserRoleOrganization :-The OMUserRoleOrganization table maintains the mapping between user roles and organizations.

OMInternalOrganization  :-The OMInternalOrganization table is the base table for each of the organizations.


POSTMAN D365

  Postman is useful to test the behavior of different OData class from/to D365FO. In this post we will see the steps to setup Postman with D...