Sunday, 22 December 2019

10 Steps of Code migration from Ax2012 to D365

Understanding the Code Migration Process
Microsoft’s new release of Dynamics 365 for Operations introduces significant changes to the development experience – from a different development environment (Visual Studio) to an entirely new programming language (X++), a new browser based client, and a new Application Lifecycle Model – Dynamics 365 for Operations is built using the latest technology. And for this reason, understanding the code migration process is essential for a smooth and fruitful outcome.
As a prerequisite, you will need to familiarize yourself with some of the Dynamics 365 for Operations development, customization, and user interface concepts (including development tools, the X++ programming language, and UI development) before you make the plunge. In order to be assigned as an administrator on the system, you need access to a Dynamics 365 for Operations development environment using Remote Desktop. And once you have the reins, you’re all set to carry out the code migration process.

Dynamics Code Migration – 10 Steps to Follow
  • Choose the Right Package: Since the Dynamics 365 for Operations application in split into various packages, the code that you migrate from Dynamics 2012 R3 will be automatically re-baselined into the appropriate package, based on your current architecture.
  • Upgrade the Code: With the LCS code upgrade service, you can automatically:
    • Get an estimation of the effort required to upgrade the solution.
    • Run migration rules to auto-migrate parts of the solution.
    • Convert metadata into the latest format
    • Check-in the upgraded solution into your Visual Studio Team Services project.
  • Configure Developer VM & VSTS: After the code upgradation, you will be required to configure your developer VM and VSTS to connect to the upgraded code branch.
  • Fix Errors: To enable automatic compilation of packages, fix all compilation errors and conflicts
  • Embrace Best Practice: To comply with the Best Practice framework, you will need to resolve certain best practice warnings (prefixed as BP) to complete migration. Also make sure to address guided code upgrade to-dos and code upgrade-specific best practice warnings.
  • Debug: To ensure smooth debugging, you may be required to change (or turn off) certain project debugging setting (default values help improve debugging speed).
  • Fix Rules: In order complete manual migration tasks, you will be required to fix certain to-dos and best practice migration specific rules as part of the code migration process.
  • Resolve Exceptions: To resolve casting exceptions (which are integral to Dynamics 365 for Operations), you can raise exceptions in different runtime scenarios, such as down-casting, casting runtime to design time objects, and side-casting.
  • Migrate Context Menus: To migrate context menus, you will need to a) add a constant for each menu option, b) build the context menu, and c) process the user selection from the menu. Make sure you place the most important commands at the top of the menu, remove ones which don’t apply, and limit the number of items to a maximum of five.
  • Migrate Mouse Double-Clicks: Finally, to cater to the various functions of the mouse double-click in AX 2012, you will be required to use a different migration approach for each scenario: moving items between two list controls requires you to use the List Panel logic and buttons; for opening a new form, you can either model a new button on the form or add a right-click context menu option, and for selecting a field in a lookup, you can add a Select button at the bottom of the lookup form to enable record selection.

Ensure a Smooth (and Successful) Migration
End-to-end process visibility, connected operations, digital intelligence, real-time information, and exceptional customer service – there are more reasons than one to embrace the next generation solution, Dynamics 365 for Operations. If you’re looking to make the move (along with several other organizations), all you need to do is follow this step-by-step approach to the migration, and successfully migrate your code and metadata from Dynamics AX 2012 R3 to Microsoft Dynamics 365 for Operations and stay up to date with all the new developments. So what are you waiting for? Get on board and enable a smarter, faster outcome for all your business processes.

Azure Deployment in D365 F&O

In this blog article, we will see how we can create a Project and Deploy a Dynamics 365 Operations Environment using Microsoft Dynamics Lifecycle Services.

Prerequisites:

  1. Lifecycle Service Account
  2. Azure Subscription

Steps:

  1. Create a new project in Lifecycle Service Account.
  2. Azure Settings
  3. Deploy Environment.
Create New project in Lifecycle Services
  1. Navigate to https://lcs.dynamics.com/Logon/Index
  2. Click Sign in.
  3. Loginwith the account you used to subscribe.
  4. Click the icon to create a new project.
  • Select the project type- “Migrate, create solutions and learn Dynamics 365 for operations”. See below screenshot for reference.
  • Enter the project information and then clickCreate.
Azure Settings:
  1. Follow this link to setup your Azure connector settings, https://ax.help.dynamics.com/en/wiki/arm-onboarding/
Deploy Environments:
  1. In newly created Project, go to Environmentssection, click the plus sign (+). Refer screenshot below
  • You can click either the Downloadlink to download the VHD or Next to deploy on Azure. Azure is the preferred path.
  • Enter the environment name. Read the terms, and then select the check box to indicate you understand them.
  • Click Next.
  • Confirm the details, and then click Deploy.
So, this will deploy the D365 Operations Environment. Let me know your reviews. I will soon come up with more articles, as I further explore D365 Operations.

Display method D365 FO

We need to mention for which object this class has been created. So decorate the class with “ExtensionOf” attribute. In this discussion, I am creating a display method for the table “SalesQuotationLine”.
 Add the attribute to cache the display method.// only for Display method.
[ExtensionOf(tableStr(SalesQuotationLine))]
final public class AE_SalesQuotationLineTbl_Extension
{
[SysClientCacheDataMethodAttribute(true)]
public static display Qty fulfillmentRemainingQty(SalesQuotationLine _this)
{
//logic
}

How do we refer this method in the form?

Please note the property “Cache data method” is set to Yes when the display method is referred.

Debug SSRS Reports & Workflow in D365 & Hide dialouge in Report

Debug SSRS Reports in D3FO 

If you want to debug data provider class you can do that through Visual studio . Put debugger in data provider class , in visual studio > debug > attach to process > select w3wp.exe  and wait for breakpoints to load . Before doing this make sure you have D365 pen in web browser . Once break pints are loaded run your report and debug code you want to debug in Visual studio

w3wp is windows process that runs web application . you select w3wp because d365 is now on the web. w3wp.exe is an IIS Worker Process that handles the web requests sent to the IIS web server for the configured IIS application pool.

visual studio > debug > attach to process > attach "w3wp.exe"

Debug Workflow
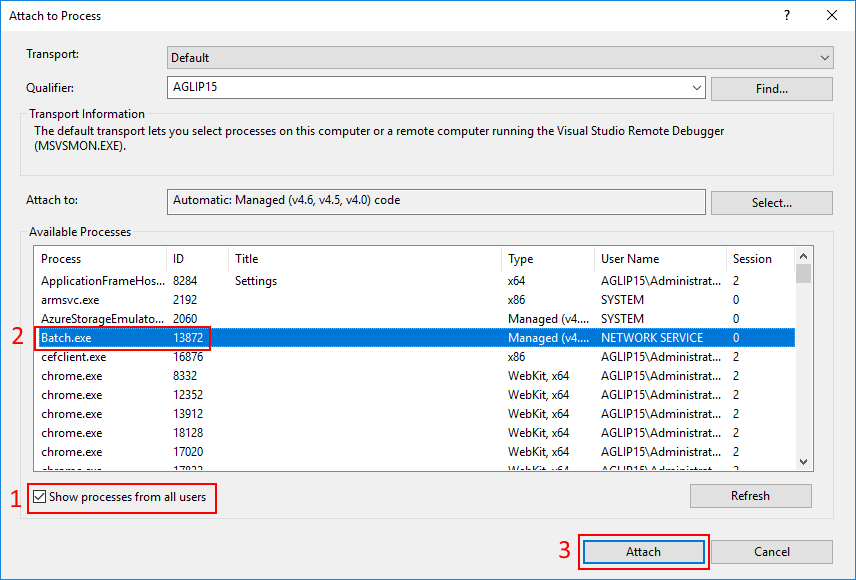
visual studio > debug > attach to process > attach "Batch.exe"

Workflows in Dynamics 365 for Finance and Operations can be debugged by attaching the debugger in Visual Studio to the Batch.exe process. This is because the workflow infrastructure uses batch processing on AOS to execute workflows. 

In order to start debugging of a workflow:
Open Visual Studio as Administrator.
In Visual Studio attach to the Batch.exe process in the Debug menu.
Put the breakpoints in a built-in workflow class (e.g. in the beginning of the SysWorkflowQueue.resume() or SysWorkflowWorkItem.create() methods)
 or in WF event handler code.
Debug> Attach to Process
attach Batch.exe


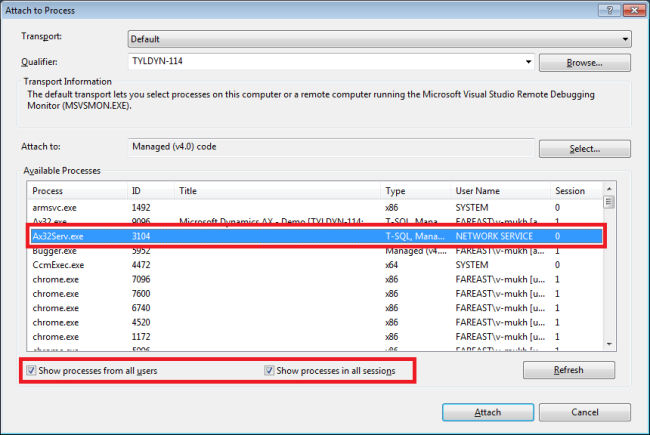
debug batch jobs and service operations AX2012


1. Open Visual Studio as an Administrator and go to Tools > Options > Debugging > General. Make sure “Enable Just My Code (Managed Only)” is unchecked.
2.Go to Debug > Attach to Process. Click “Select…” and check the appropriate version of the managed code in your case.
3.“Attach to Process” form. Select Ax32Serv.exe from the list of processes.
Image


To Hide dialog for SSRS Report in ax 2012 you need to go to controller class and follow below steps.

Go to Controller class then go to  main method of class.

Find  statement : Controller.startOperation(); then specify the below statement to hide dialog box which used for range selection.

Controller.parmShowDialog(false);

To show dialog you can pass value true instead of false.


Workflow Email Alert

Creating Workflow Email Alerts in D365

1.Set up an email address for any user who will receive the alerts and enable workflow email alerts for that user
System Administration -> Users -> Users
Highlight and click on the user, if no email is attached, enter the users E-mail address
On the ribbon, click ‘User Options’
On the left side, click ‘Workflow’ and set ‘Send notifications in email’ to Yes

2.Configure E-mail Parameters to use the SMTP server
System Administration -> Set up -> E-mail -> E-mail Parameters
On the left side, click ‘SMTP settings’
Enter the appropriate information specific to your mail server. You may need to contact your IT department

3. Create an email template or email messages
Templates and messages are different, and the use case depends on the workflow. The user can not select which to use, it is predetermined. A template is company specific, which means it will have to be configured for each legal entity.
To create a template, follow the path: Organization Administration -> Setup -> E-mail Templates
An email message is organization wide, which means it is global and only needs to be configured once.
To create one follow the path: b. System Administration -> Setup -> E-mail -> E-mail Messages

4. Assign your email template to the specific workflow
Open the workflow, select Basic Settings, and select your workflow template in the dropdown menu
5. Set up the appropriate notifications on the specific task/control/approval
6. Set up the batch job to distribute the email messages
System Administration -> Periodic Tasks -> E-mail Processing -> Batch. NOTE - If you want the emails sent on a regular schedule, make sure under ‘Recurrence’ to adjust the recurrence to reflect the schedule you want. 
7. Monitor e-mail sending status
System Administration -> Periodic Tasks -> E-mail Processing -> E-mail Sending Status
At the top, you will see the successfully sent messages as well as those pending/failed.

Wednesday, 11 December 2019

Customizing SSRS Report Using Extension in D365FO Steps

Customizing SSRS Report Using Extension in D365FO Steps 

● Create extension of FreeTextInvoiceTmp table and add the field i.e. TotalAmounInWords
● Create a class named FreeTextInvoiceController_Events to implement the event handler methods
● Copy the post handler event method of processReport() of FreeTextInvoiceDP class and 
    paste in the class created in previous step.
     NOTE: You can also use the OnInserting event of table instead of processReport() of DP class.
● Write the following logic to insert the data into the TotalAmounInWords field we have created:
class FreeTextInvoiceController_Events
{
    [PostHandlerFor(classStr(FreeTextInvoiceDP), methodStr(FreeTextInvoiceDP, processReport))]
    public static void FreeTextInvoiceDP_Post_processReport(XppPrePostArgs args)
    {
        FreeTextInvoiceDP dpInstance = args.getThis() as FreeTextInvoiceDP;
        FreeTextInvoiceHeaderFooterTmp freeTextInvoiceHeaderFooterTmp = dpInstance.getFreeTextInvoiceHeaderFooterTmp();
        FreeTextInvoiceTmp freeTextInvoiceTmp = dpInstance.getFreeTextInvoiceTmp();
        ttsbegin;
        while select forUpdate freeTextInvoiceTmp
        {
            freeTextInvoiceTmp.TotalAmounInWords = 
            numeralsToTxt(freeTextInvoiceTmp.InvoiceAmount);
            freeTextInvoiceTmp.update();
        }
        ttscommit;
    }
}
● Find out the FreeTextInvoice report in the AOT
● Right-click the report and click Duplicate in project.
● Customize the design and add TotalAmountInWords field as per your requirements
● Create another class named FreeTextInvoiceControllerExt which extends        the FreeTextInvoiceController class. Override the main() method. 
●Give the new report and it’s design name in it.
● Add the following logic in FreeTextInvoiceControllerExt class:
class FreeTextInvoiceControllerExt extends FreeTextInvoiceController
{
    public static FreeTextInvoiceControllerExt construct()
    {
        return new FreeTextInvoiceControllerExt();
    }
    public static void main(Args _args)
    {
        SrsReportRunController formLetterController = FreeTextInvoiceControllerExt::construct();
        FreeTextInvoiceControllerExt controller = formLetterController;
        controller.parmReportName(ssrsReportStr(FreeTextInvoiceCopy, Report));
        controller.parmArgs(_args);
        controller.startOperation();
    }
}
● Create extension of the following menu items which executes report:
       ● FreeTextInvoiceCopy
       ● FreeTextInvoiceOriginal
● Change the controller class name in the Object property of the extended menu items to the FreeTextInvoiceControllerExt class created above
● Save, build and synchronize and deploy the project/reports.
Optional if Print Management is there
● Create another class named PrintMgtDocTypeHandlersExt
● Add a method in it which subscribes to the event delegate of PrintMgmtDocType class to 
re-route the report from the default to this customized report
● Add the following logic in PrintMgtDocTypeHandlersExt class:
class PrintMgtDocTypeHandlersExt
{
    [SubscribesTo(classstr(PrintMgmtDocType), delegatestr(PrintMgmtDocType, getDefaultReportFormatDelegate))]
    public static void getDefaultReportFormatDelegate(PrintMgmtDocumentType _docType, EventHandlerResult _result)
    {
        switch (_docType)
        {
            case PrintMgmtDocumentType::SalesFreeTextInvoice:
                _result.result(ssrsReportStr(FreeTextInvoiceCopy, Report));
                break;
        }
    }
}

POSTMAN D365

  Postman is useful to test the behavior of different OData class from/to D365FO. In this post we will see the steps to setup Postman with D...