Thursday, 12 November 2020

Data entites method calling sequence in D365FO

Here is a sequence of method’s calls during export:

https://rahulmsdax.blogspot.com/2019/08/data-entity-methods-execution-sequence.html


1. initValue
2. validateField
3. validateWrite
4. update
4.1. doUpdate
4.1.1. persistEntity
4.1.1.1. doPersistEntity
4.1.1.1.1. initializeDataSources
4.1.1.1.1.1. initializeEntityDataSource
Note: initializeDataSource is called once for each DataSource in Entity.
4.1.1.1.2. mapEntityToDataSources
Note: initializeDataSource is called once for each DataSource in Entity.
4.1.1.1.3. saveDataSources
4.1.1.1.3.1. updateEntityDataSource
4.1.1.1.4. mapEntityToDataSource (maybe for another record)
4.1.1.1.5. saveDataSources
4.1.1.1.5.1. updateEntityDataSource for update operation and (insertEntityDataSource for insert)
4.1.1.1.5.1.1. mapDataSourceToEntity
4.1.1.1.5.1.2. doSaveDataSource
4.1.1.1.5.1.2.1. updateDataSource
4.1.1.1.5.1.2.1.1. preupInsertDataSource
4.1.1.1.5.1.2.1.1.1. validateWrite of table
Plus:
postLoad
This method is called during the export for setting the value to unmapped fields after entity is downloaded to datasource.

EXPORT:
       Entity- postLoad()
       staging - insert()
       Entity- postLoad() - depends on records

IMPORT:
       staging - postLoad()
       Entity - postLoad()
       Entity - initValue()
       Entity - validateField() - depends on no of fields
       Entity - validateWrite()
       Entity - insert() / update()
       Entity - persistEntity()
       Entity - initializeEntityDataSource()
       Entity - mapEntityToDataSource()
       Entity - insertEntityDataSource() / updateEntityDataSource()
       Entity - mapDataSourceToEntity()
       staging - postLoad()

Here are some method’s calls during Import:

defaultCTQuery
copyCustomStagingToTarget
postGetStagingData
preTargetProcessSetBased
postTargetProcess

Sunday, 1 November 2020

Setting up Release Pipeline in Azure DevOps for Dynamics 365 for Finance and Operations

 Reference: https://ariste.info/en/2019/02/setting-up-release-pipeline-in-azure-devops-for-dynamics-365-for-finance-and-operations/


To configure the release pipeline, we need:

  • AAD app registration
  • LCS project
  • An Azure DevOps project linked to the LCS project above
  • A service account

I recommend the user to be a service account with a non-expiring password and enough privileges on LCS, Azure and Azure DevOps (well, this is not a recommendation, without rights this cannot be done). This is not mandatory and can be done even with your user (if it has enough rights) for testing purposes.

AAD app creation

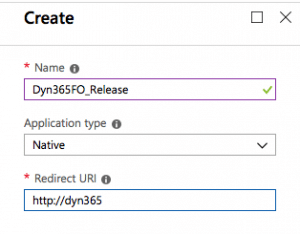
The first step to take is creating an app registration on Azure Active Directory to upload the generated deployable package to LCS. Head to Azure portal  and once logged in go to Azure ActiveDirectory, then App Registrations and create a new Native app:

Nueva app azure AD

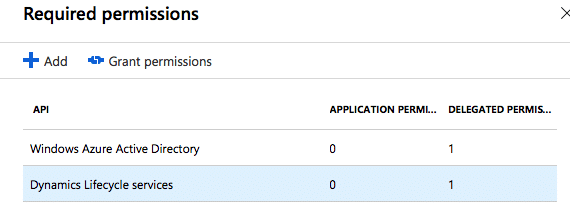
Next go to “Settings” and “Required permissions” to add the Dynamics Lifecycle Services API:

Permiso de LCS

Select the only available permission in step 2 and accept until it appears on the “Required permissions” screen. Finally push the “Grant permissions” button to apply the changes:

Grant permission

This last step can be easily forgotten and the package upload to LCS cannot be done if not granted. Once done take note of the Application ID, we’ll use it later.

Create the release pipeline in DevOps

Before setting up anything on Azure DevOps we need to make sure the project we’re going to use is linked to LCS. This can be done in the “Visual Studio Team Services” tab in LCS’ project settings.

Configure your Lifecycle Services project to connect to Azure DevOps

    1. Navigate to LCS project, go to the Project settings tile, select Visual Studio Team Services à click –Setup Visual Studio Team Services button.

Note: if you have already configured LCS to connect to your Azure DevOps project, you can skip this section. 

2. Enter the root URL for your Azure DevOps account and the access token created earlier, and then click Continue.

Examplehttps://<companyName>.visualStudio.com 

3.Select VSTS service project within your Azure DevOps account that you want to connect to, and click Continue.

4.On the Review and save page, click Save.

After setting it up, we’ll go to Pipelines -> Releases to create the new release. Select “New release pipeline” and choose “Empty job” from the list.

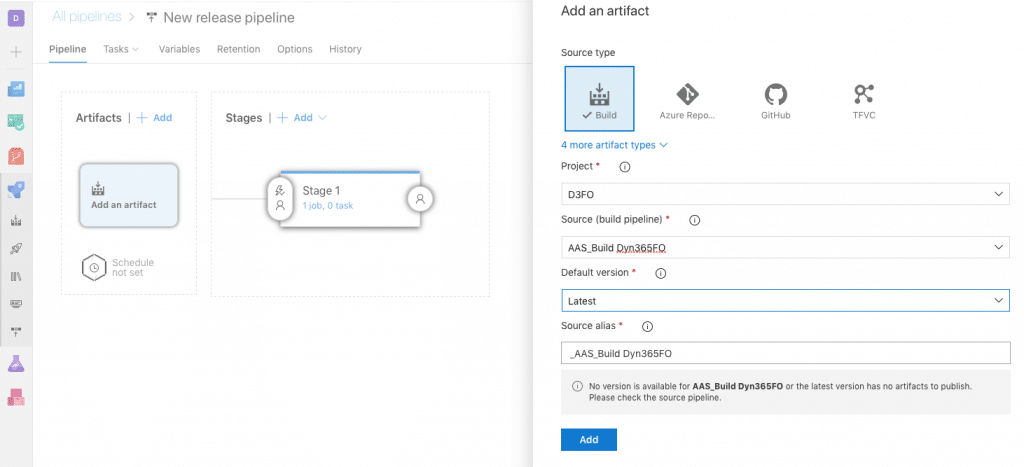
On the artifact box select the build which we will link to this release definition:

New release

Pick the build definition you want to use for the release in “Source”, “Latest” in “Default version” and push “Add”.

The next step we’ll take is adding a Task with the release pipeline for Dynamics. Go to the Tasks tab and press the plus button. A list with extension will appear, look for “Dynamics 365 Unified Operations Tools”:

Dynamics 365 Unified Operations Tools

If the extension hasn’t been added previously it can be done in this screen. In order to add it, the user used to create the release must have admin rights on the Azure DevOps account, not only in the project in which we’re creating the pipeline.

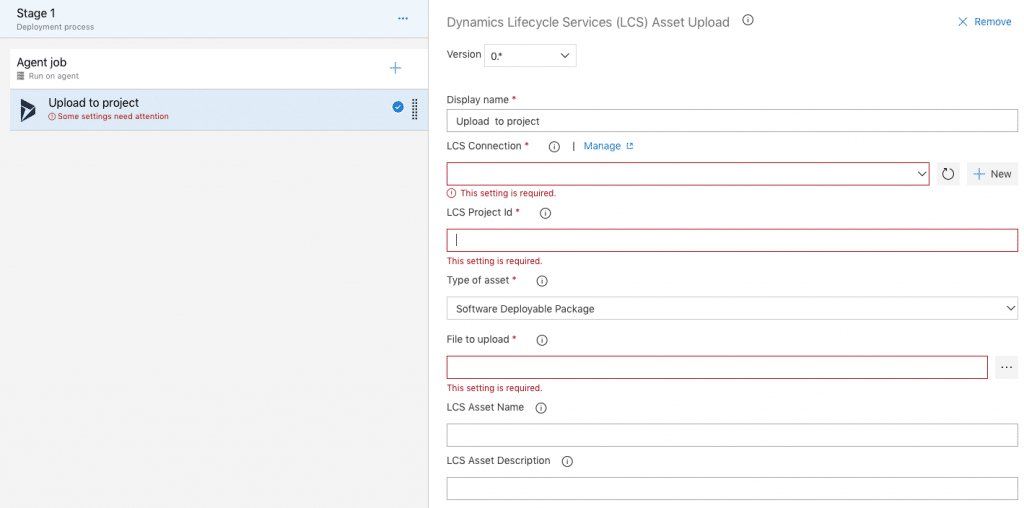
When the task is created we need to fill some parameters:Release Dynamics Operations

Creating the LCS connection

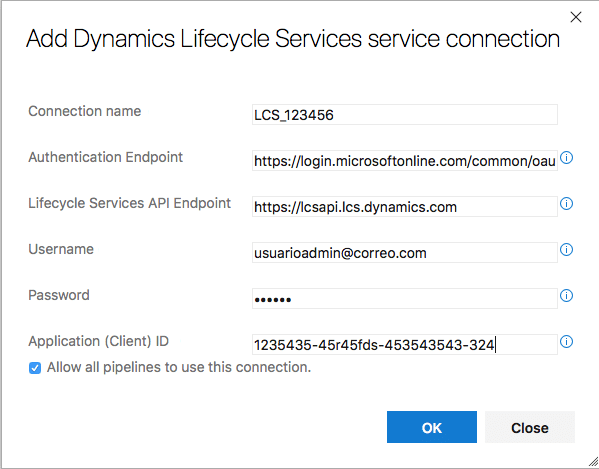
The first step in the task is setting up the link to LCS using the AAD app we created before. Press New and let’s fill the fields in the following screen:

Coenxión LCS Azure DevOps

It’s only necessary to fill in the connection name, username, password (from the user and Application (Client) ID fields. Use the App ID we got in the first step for the App ID field. The endpoint fields should be automatically filled in. Finally, press OK and the LCS connection is ready.

In the LCS Project Id field, use the ID from the LCS project URL, for example in https://lcs.dynamics.com/V2/ProjectOverview/1234567 the project is is 1234567.

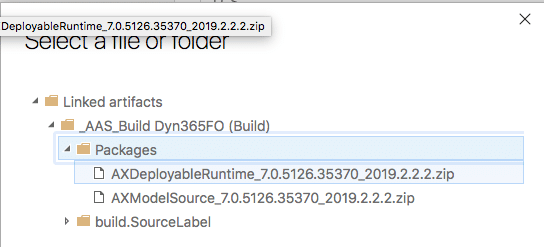
Press the button next to “File to upload” and select the deployable package file generated by the build:

DP Generado

If the build definition hasn’t been modified, the output DP will have a name like AXDeployableRuntime_VERSION_BUILDNUMBER.zip. Change the fixed Build Number for the DevOps variable $(Build.BuildNumber) like in the image below:

BUildNumber

The package name and description in LCS are defined in “LCS Asset Name” and “LCS Asset Description”. For these fields, Azure DevOps’ build variables and release variables can be used. Use whatever fits your project, for example a prefix to distinguish between prod and pre-prod packages followed by $(Build.BuildNumber), will upload the DP to LCS with a name like Prod 2019.1.29.1, using the date as a DP name.

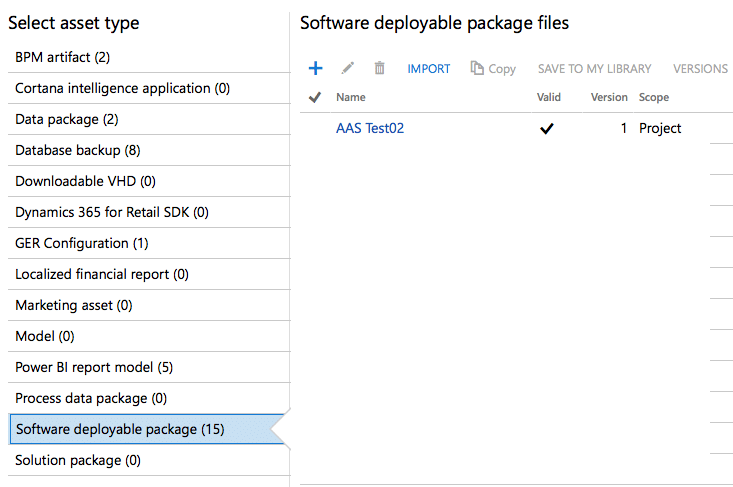
Save the task and release definition and let’s test it. In the Releases select the one we have just created and press the “Create a release” button, in the dialog just press OK. The release will start and, if everything is OK we’ll see the DP in LCS when it finishes:

LCS Asset Library

The release part can be automated, just press the lightning button on the artifact and enable the trigger:

Release trigger

And that’s all! Now the build and the releases are both configured. Once the deployment package is published the CI scenario will be complete.

Subscribe!

Friday, 23 October 2020

Setup CDX sync for new custom table from AX to Channel (Download Job) in Dynamics 365 Retail

 Reference: https://d365byjp.blogspot.com/2018/03/setup-sync-for-new-custom-table-from-ax.html

The post shows how to create a new custom table across both AX and the channel and setup sync(CDX) in Dynamics 365 Retail.

Changes are in AX tables, CDX, Channel DB

Setup steps:-
1. AX Customization:

- Create a new Table called ISVRetailStoreHoursTable
        - Enum field: Day,  enum type: WeekDays, mandatory,
        - Int field: OpenTime, extended data type: TimeOfDay, mandatory,
        - Int field: ClosingTime, extended data type: TimeOfDay, mandatory,
        - Int64 field: RetailStoreTable, extended data type: RefRecId, mandatory

- Create a Foreign Key Relation to RetailStoreTable
        - Name: RetailStoreTable
        - Cardinality: ZeroOne
        - RelatedTable: RetailStoreTable
        - Related table cardinality: ExactlyOne
        - Relationship type: Association
        - Contraint: Normal, name: RetailStoreTable, Field: RetailStoreTable, Related field: RecId


- Populate some data by running below job or manually enter some data.

class Temp_InsertData
{       
    /// <summary>
    /// Runs the class with the specified arguments.
    /// </summary>
    /// <param name = "_args">The specified arguments.</param>
    public static void main(Args _args)
    {       
        ISVRetailStoreHoursTable     storeDayHoursTable;
        RetailStoreTable                storeTable;
        Int64                           numberOfDeletedRows;
       
        // insert data for houston
        select * from storeTable
            where storeTable.StoreNumber == "HOUSTON";
       
        print storeTable.Recid;
       
       
        ttsBegin;
       
        delete_from storeDayHoursTable
            where storeDayHoursTable.RetailStoreTable == storeTable.RecId;
        numberOfDeletedRows = storeDayHoursTable.RowCount();
        print numberOfDeletedRows;
       
        // yyyy-mm-ddThh:mm:ss
       
        storeDayHoursTable.RetailStoreTable =  storeTable.RecId;
        storeDayHoursTable.Day = WeekDays::Monday;
        storeDayHoursTable.OpenTime = DateTimeUtil::time(DateTimeUtil::parse("2015-05-18T08:00:00"));
        storeDayHoursTable.ClosingTime = DateTimeUtil::time(DateTimeUtil::parse("2015-05-18T20:00:00"));
        storeDayHoursTable.insert();
       
        storeDayHoursTable.RetailStoreTable =  storeTable.RecId;
        storeDayHoursTable.Day = WeekDays::Tuesday;
        storeDayHoursTable.OpenTime = DateTimeUtil::time(DateTimeUtil::parse("2015-05-18T08:00:00"));
        storeDayHoursTable.ClosingTime = DateTimeUtil::time(DateTimeUtil::parse("2015-05-18T20:00:00"));
        storeDayHoursTable.insert();
       
        storeDayHoursTable.RetailStoreTable =  storeTable.RecId;
        storeDayHoursTable.Day = WeekDays::Wednesday;
        storeDayHoursTable.OpenTime = DateTimeUtil::time(DateTimeUtil::parse("2015-05-18T11:00:00"));
        storeDayHoursTable.ClosingTime = DateTimeUtil::time(DateTimeUtil::parse("2015-05-18T21:00:00"));
        storeDayHoursTable.insert();
       
        storeDayHoursTable.RetailStoreTable =  storeTable.RecId;
        storeDayHoursTable.Day = WeekDays::Thursday;
        storeDayHoursTable.OpenTime = DateTimeUtil::time(DateTimeUtil::parse("2015-05-18T09:00:00"));
        storeDayHoursTable.ClosingTime = DateTimeUtil::time(DateTimeUtil::parse("2015-05-18T20:00:00"));
        storeDayHoursTable.insert();
       
        storeDayHoursTable.RetailStoreTable =  storeTable.RecId;
        storeDayHoursTable.Day = WeekDays::Friday;
        storeDayHoursTable.OpenTime = DateTimeUtil::time(DateTimeUtil::parse("2015-05-18T08:00:00"));
        storeDayHoursTable.ClosingTime = DateTimeUtil::time(DateTimeUtil::parse("2015-05-18T20:00:00"));
        storeDayHoursTable.insert();
       
        storeDayHoursTable.RetailStoreTable =  storeTable.RecId;
        storeDayHoursTable.Day = WeekDays::Saturday;
        storeDayHoursTable.OpenTime = DateTimeUtil::time(DateTimeUtil::parse("2015-05-18T10:00:00"));
        storeDayHoursTable.ClosingTime = DateTimeUtil::time(DateTimeUtil::parse("2015-05-18T18:00:00"));
        storeDayHoursTable.insert();
        ttsCommit;
    }

}

2. CDX CHANGE:-

- -        Create a new resource file with all job, sub jobs and table information as below and save it as ISVRetailStoreHoursTable.xml file.

<RetailCdxSeedData ChannelDBMajorVersion="7" ChannelDBSchema="ext" Name="AX7">
<Jobs>
   <!-- <Job DescriptionLabelId="REX4520710" Description="Custom job" Id="1070"/> -->
</Jobs>
  <Subjobs>
    <Subjob Id="ISVRetailStoreHoursTable" TargetTableSchema="ext" AxTableName="ISVRetailStoreHoursTable">
      <ScheduledByJobs>
        <ScheduledByJob>1070</ScheduledByJob>
      </ScheduledByJobs>
      <AxFields>
        <Field Name="Day"/>
        <Field Name="RetailStoreTable"/>
        <Field Name="OpenTime"/>
        <Field Name="ClosingTime"/>
        <Field Name="RecId"/>
      </AxFields>
    </Subjob>
  </Subjobs>
</RetailCdxSeedData>


-        Right-click the project, and then select Add > New Item
-        In the Add New item dialog box, select Resources, name the resource file RetailCDXSeedDataAX7_Demo, and then select Add.


-        In the Select a Resource file dialog box, find the resource file that you created in step 2, and then select Open.


-        Add a new class that should be used to handle the registerCDXSeedDataExtension event. Search for the RetailCDXSeedDataBase class in AOT, and then open it in the designer. Right-click the registerCDXSeedDataExtension delegate, and then select Copy event handler.

-        Go to the event handler class that you created, and paste the following event handler code into it.


class RetailCDXSeedDataAX7EventHandler
{
   
    /// <summary>
    ///
    /// </summary>
    /// <param name="originalCDXSeedDataResource"></param>
    /// <param name="resources"></param>
    [SubscribesTo(classStr(RetailCDXSeedDataBase), delegateStr(RetailCDXSeedDataBase, registerCDXSeedDataExtension))]
    public static void RetailCDXSeedDataBase_registerCDXSeedDataExtension(str originalCDXSeedDataResource, List resources)
    {
        if (originalCDXSeedDataResource == resourceStr(RetailCDXSeedDataAX7))
        {
           resources.addEnd(resourceStr(RetailCDXSeedDataAX7_Demo));
        }
    }

}
-        Whenever the Retail initialization class runs, it looks for any extension that implements this handler. If an extension is found, the runtime will also initialize the custom information that is found in the resource file.
-        Before you add your custom resource to the list, you must verify that the originalCDXSeedDataResource resource that is being processed is RetailCDXSeedDataAX7. Otherwise, you might cause unintended results.

-        Navigate to Retail > Headquarters setup > Retail scheduler and click on Initialize retail scheduler.


-        In the dialog box that appears, select Delete existing configuration.
-        Select OK to start the initialization.


-        When the initialization is completed, the CDX scheduler jobs, subjob definitions, and distribution schedules are updated by using the original RetailCDXSeedDataAX7 resource and the customized RetailCDXSeedDataAX7_Demo resource.

    3. Verify Changes:

-        Navigate to Retail > Headquarters setup > Retail scheduler > Scheduler subjobs , here we can see ISVRetailStoreHoursTable is added under Scheduler subjobs and scheduled by 1070 as specified in resource file.


      4. Channel DB:
-        Run the below query to create table in Channel database, here we should create custom tables in ext schema as we are not allowed to override the standard.
-        The advantage of using ext schema , while DB upgrade we will not face any conflict .
 -- Create the extension table to store the custom fields.

IF (SELECT OBJECT_ID('[ext].[ISVRETAILSTOREHOURSTABLE]')) IS NULL
BEGIN
    CREATE TABLE [ext].[ISVRETAILSTOREHOURSTABLE](
        [RECID] [bigint] NOT NULL,
        [DAY] [int] NOT NULL DEFAULT ((0)),
        [OPENTIME] [int] NOT NULL DEFAULT ((0)),
        [CLOSINGTIME] [int] NOT NULL DEFAULT ((0)),
        [RETAILSTORETABLE] [bigint] NOT NULL DEFAULT ((0)),
    CONSTRAINT [I_ISVRETAILSTOREHOURSTABLE_RECID] PRIMARY KEY CLUSTERED
    (
        [RECID] ASC
    )WITH (PAD_INDEX = OFF, STATISTICS_NORECOMPUTE = OFF, IGNORE_DUP_KEY = OFF, ALLOW_ROW_LOCKS = ON, ALLOW_PAGE_LOCKS = ON) ON [PRIMARY]
    ) ON [PRIMARY]

    ALTER TABLE [ext].[ISVRETAILSTOREHOURSTABLE]  WITH CHECK ADD CHECK  (([RECID]<>(0)))
END
GO

GRANT SELECT, INSERT, UPDATE, DELETE ON OBJECT::[ext].[ISVRETAILSTOREHOURSTABLE] TO [DataSyncUsersRole]

                  - Create view for the table we created that joins the original table on the channel side and                      the extension table on the channel side is created. This view is required so that CDX can                      correctly download and push the records from Retail HQ tables to the channel extension                      table back.


-- Create the customer extension view that is accessed by CRT to query the custom fields.

IF (SELECT OBJECT_ID('[ext].[ISVRETAILSTOREHOURSVIEW]')) IS NOT NULL
    DROP VIEW [ext].[ISVRETAILSTOREHOURSVIEW]
GO

CREATE VIEW [ext].[ISVRETAILSTOREHOURSVIEW] AS
(
    SELECT
        sdht.DAY,
        sdht.OPENTIME,
        sdht.CLOSINGTIME,
        sdht.RECID,
        rst.STORENUMBER
    FROM [ext].[ISVRETAILSTOREHOURSTABLE] sdht
    INNER JOIN [ax].RETAILSTORETABLE rst ON rst.RECID = sdht.RETAILSTORETABLE
)
GO

GRANT SELECT ON OBJECT::[ext].[ISVRETAILSTOREHOURSVIEW] TO [UsersRole];
GO

5. Verify CDX:

    - run 1070 job full sync (channel data group)
    - check Download sessions and channel DB that the data arrived

POSTMAN D365

  Postman is useful to test the behavior of different OData class from/to D365FO. In this post we will see the steps to setup Postman with D...