Monday, 13 November 2017

Developing a custom DIXF entity in Microsoft Dynamics AX 2012

Go to Data Import Export Framework module and click on “Create a custom entity for data import/export” in the Common section.
001
A new wizard will open. Click next.
002
In the next screen you will be asked to choose a table for which the DIXF entity needs to be created.
003
In our case we selected VendBankAccount.
004
In the next screen the Entity Table Name, Entity Query Name, Entity Class Name will be automatically filled. You will need to select the Display menu item name based on the entity you selected and click next.
005
Select the fields you need. You can mark them to select some of the fields or click on Enable All to select all the fields and click next. 006
Click finish to complete the wizard.
007
After some time of processing AX will automatically create a Private Project which will contain all the objects related to your custom DIXF entity.
008
NOTE: You have to ensure your DMFstaging table has a primary index including the fields DefinitionId, ExecutionId and the primary key of the target table.
Also check if the DMF staging table has a relation with the target table on your primary field. This might be your problem.
Check e.g. the relations on an existing DMF staging table.
Go to Target Entities Form. Click new and select the new custom entity from the lookup.
009
Give the Entity name and click save. 010
You custom DIXF entity has been created.
011

Wednesday, 8 November 2017

How to Send Email Notification Of Workflow

Let’s enlarge some more features of AX Workflow. Dynamics Ax2012 facilitates the powerful Email  mechanism which can be used commonly across the modules for new implementations. Especially to fulfill the users wish on getting notification through emails and helping them in their daily activities. 

Scenario:
Edward is an accounting manager and who is not involved in PR approvals as he is occupied by other responsibilities but still he wants to be notified whenever a purchase requisition is approved.

To achieve this follow the below process:

Setup an email address for a user who wishes to receive email.
Navigate to System Administration -> Common -> Users->Select the desired user ->Click on Options.
Enter users email id.


Click ‘Notifications’ and then check the box next to ‘Send notifications in email


Set up AX E-mail Parameters to use the SMTP server
Navigate to System Administration -> Setup -> System -> E-mail Parameters ->Enter details about mail server.


Create an email template navigate to Organization Administration -> Setup -> E-mail Templates ->
Check the checkbox "Show system emails".


Assign your email template to the specific workflow, Navigate to the desired workflow click on basic settings and select the created email template under “email template for workflow notification”


Select the desired notifications on the specific task.


Setup the batch job to distribute the email messages, System Administration -> Periodic -> E-mail Processing -> Batch


Thus by doing this configuration whenever a PR is approved Edward will receive an email notification.

To get the list of Roles assigned to users in AX 2012

we can fetch the required data from Two tables with the help of a small job.
Tables :  SecurityRole & SecurityUserRole


static void SecurityRole(Args _args)
{
  SecurityRole          securityRole;
  SecurityUserRole     securityUserRole;
  
    while select RecId,name from securityRole   
    join securityUserRole   
    where securityRole.RecId == SecurityUserRole.SecurityRole   
    //&& SecurityUserRole.User == curUserId() //for current user roles
    {
      info(strFmt("%1 - %2",SecurityUserRole.User,securityRole.name));
    }
}

Monday, 30 October 2017

Work Flows From Scratch in Axapta 2012

Purpose:

The purpose of this document is to describe how we can develop a custom workflow template.

Business requirement:

Ability to have approval process for customers. Standard AX does not offer any workflow for customers approval out-of-the-box.

Unit testing prerequisites:

The following steps must be completed before a workflow can be unit tested.
  1. Configure workflow execution account.
  2. Configure workflow batch jobs

Development:

1. Create a workflow status Enum to have the following elements:
customer-approval-workflow
2. Add field of type workflow status enum to the CustTable table.
3. Override canSubmitToWorkflow() method of CustTable table to define workflow submission criteria.
public boolean canSubmitToWorkflow(str _workflowType = '')
{
    boolean canSubmit = false;

    if (custTable.RecId &&
 custTable.MzkWorkflowApprovalStatus == MzkCustWFApprovalStatus::NotSubmitted)
    {
        canSubmit = true;
    }

    return canSubmit;
}
4. Add a static method on CustTable table to update workflow status. This method will be called from workflow event handlers and workflow approval event handlers.
static void mzkUpdateWorkflowStatus(RefRecId _recId, MzkCustWorkflowStatus _status)
{
    CustTable custTable;

    custTable = CustTable::findRecId(_recId, true);

    ttsBegin;
    custTable.MzkWorkflowApprovalStatus = _status;
    custTable.update();
    ttsCommit;
}
5. Create a Query for the CustTable table.
customer-approval-workflow
6. Create a Workflow Category.
7. Create a Workflow Type using wizard.
customer-approval-workflow
Where,
  • Category – Name of the workflow category.
  • Query – Name of the query.
  • Document menu item – Name of display menu item for the document form.
The following artifacts will be created:
  • Workflow type
  • Classes
    • Document class which extends WorkflowDocument.
    • EventHandler class which gives implementation to handle different workflow events.
    • SubmitManager class.
  • Action menu items:
    • SubmitMenuItem pointing to SubmitManager class.
    • CancelMenuItem pointing to WorkflowCancelManager class.
8. Enable Workflow on CustTable and CustTableListPage form by setting Design node properties as follows:
  • WorkflowEnabled – Yes.
  • WorkflowDatasource – Name of the form datasource, CustTable.
  • WorkflowType – Name of the custom workflow type created.
9. Give submit logic in SubmitManager class.
public static void main(Args _args)
{
    MzkCustWorkflowTypeSubmitManager submitManager;

    submitManager = new MzkCustWorkflowTypeSubmitManager();
    submitManager.submit(_args);
}
public void submit(Args _args)
{
    RecId                 _recId;
    WorkflowCorrelationId _workflowCorrelationId;
    workflowTypeName      _workflowTypeName;
    WorkflowComment       _initialNote;
    WorkflowSubmitDialog  workflowSubmitDialog;

    _recId = _args.record().RecId;
    _workflowTypeName = workFlowTypeStr("MzkCustWorkflowType");
    _initialNote = "";

    // Opens the submit to workflow dialog.
    workflowSubmitDialog = WorkflowSubmitDialog::construct(
 _args.caller().getActiveWorkflowConfiguration());

    workflowSubmitDialog.run();

    if (workflowSubmitDialog.parmIsClosedOK())
    {
        _recId = _args.record().RecId;
        // Get comments from the submit to workflow dialog.
        _initialNote = workflowSubmitDialog.parmWorkflowComment();

        try
        {
            ttsbegin;

            _workflowCorrelationId = Workflow::activateFromWorkflowType(
  _workflowTypeName, _recId, _initialNote, NoYes::No);

            ttscommit;

            // Updates the workflow button to diplay Actions instead of Submit.
            _args.caller().updateWorkflowControls();

            info("Submitted to workflow.");
        }
        catch(exception::Error)
        {
            error("Error on workflow activation.");
        }
    }
}
10. Create a Workflow Approval element using the wizard.
customer-approval-workflow
11. Drag the newly created approval to the Supported elements node of the custom workflow type.
12. Define workflow type event handlers in workflow type event handler class.
class MzkCustWorkflowTypeEventHandler implements
    WorkflowCanceledEventHandler,
    WorkflowCompletedEventHandler,
    WorkflowStartedEventHandler
{
}
public void started(WorkflowEventArgs _workflowEventArgs)
{
    CustTable::mzkUpdateWorkflowStatus(
 _workflowEventArgs.parmWorkflowContext().parmRecId(),
 MzkCustWFApprovalStatus::Submitted);
}
public void completed(WorkflowEventArgs _workflowEventArgs)
{
    CustTable::mzkUpdateWorkflowStatus(
 _workflowEventArgs.parmWorkflowContext().parmRecId(),
 MzkCustWFApprovalStatus::Completed);
}
public void canceled(WorkflowEventArgs _workflowEventArgs)
{
    CustTable::mzkUpdateWorkflowStatus(
 _workflowEventArgs.parmWorkflowContext().parmRecId(),
 MzkCustWFApprovalStatus::Canceled);
}
13. Define approval element event handlers in workflow approval element event handler class.
class MzkCustWFApprovalEventHandler implements
    WorkflowElementCanceledEventHandler,
    WorkflowElemChangeRequestedEventHandler,
    WorkflowElementCompletedEventHandler,
    WorkflowElementReturnedEventHandler,
    WorkflowElementStartedEventHandler,
    WorkflowElementDeniedEventHandler,
    WorkflowWorkItemsCreatedEventHandler
{
}
public void started(WorkflowElementEventArgs _workflowElementEventArgs)
{
    CustTable::mzkUpdateWorkflowStatus(
 _workflowElementEventArgs.parmWorkflowContext().parmRecId(),
 MzkCustWFApprovalStatus::Submitted);
}
public void changeRequested(WorkflowElementEventArgs _workflowElementEventArgs)
{
    CustTable::mzkUpdateWorkflowStatus(
 _workflowElementEventArgs.parmWorkflowContext().parmRecId(),
 MzkCustWFApprovalStatus::ChangeRequested);
}
public void canceled(WorkflowElementEventArgs _workflowElementEventArgs)
{
    CustTable::mzkUpdateWorkflowStatus(
 _workflowElementEventArgs.parmWorkflowContext().parmRecId(),
 MzkCustWFApprovalStatus::PendingCancelation);
}
public void completed(WorkflowElementEventArgs _workflowElementEventArgs)
{
    CustTable::mzkUpdateWorkflowStatus(
 _workflowElementEventArgs.parmWorkflowContext().parmRecId(),
 MzkCustWFApprovalStatus::Completed);
}
public void returned(WorkflowElementEventArgs _workflowElementEventArgs)
{
    CustTable::mzkUpdateWorkflowStatus(
 _workflowElementEventArgs.parmWorkflowContext().parmRecId(),
 MzkCustWFApprovalStatus::Returned);
}
public void created(WorkflowWorkItemsEventArgs _workflowWorkItemsEventArgs)
{
    CustTable::mzkUpdateWorkflowStatus(
        _workflowWorkItemsEventArgs.parmWorkflowElementEventArgs().parmWorkflowContext().parmRecId(),
        MzkCustWFApprovalStatus::Created);
}
14. Define the resubmit action manager class.
public class MzkCustWFApprovalResubmitActionMgr
{
}
public static void main(Args _args)
{
    RecID                        recID;
    TableId                      tableId;
    CustTable                    custTable;
    WorkflowWorkItemTable        workItem;
    WorkflowWorkItemActionDialog workflowWorkItemActionDialog;
    
    recID = _args.record().RecId;
    tableId = _args.record().TableId;
    custTable = _args.record();
    workItem = _args.caller().getActiveWorkflowWorkItem();

    if (workItem.RecId > 0)
    {
        try
        {
            workflowWorkItemActionDialog = WorkflowWorkItemActionDialog::construct(
                workItem,
                WorkflowWorkItemActionType::Resubmit,
                new MenuFunction(_args.menuItemName(),_args.menuItemType()));

            workflowWorkItemActionDialog.run();

            if (workflowWorkItemActionDialog.parmIsClosedOK())
            {
                if (custTable.MzkWorkflowApprovalStatus ==
   MzkCustWFApprovalStatus::ChangeRequested)
                {
                    workItem = _args.caller().getActiveWorkflowWorkItem();
                    WorkflowWorkItemActionManager::dispatchWorkItemAction(workItem,
                        workflowWorkItemActionDialog.parmWorkflowComment(),
                        workflowWorkItemActionDialog.parmTargetUser(),
                        WorkflowWorkItemActionType::Resubmit,
                        _args.menuItemName(),
                        false);

                    custTable.MzkWorkflowApprovalStatus
   = MzkCustWFApprovalStatus::Submitted;

                    ttsbegin;
                    custTable.dataSource().write();
                    ttscommit;
                }
                else
                {
                    throw Exception::Error;
                }
            }
        }
        catch(Exception::Error)
        {
            throw error(strfmt("Cannot resubmit workflow."));
        }
    }

    _args.caller().updateWorkflowControls();
}
15. Design the Workflow.
  • Navigate to Accounts receivable > Setup > Accounts receivable workflows.
  • Create a new workflow instance of the workflow type you created.
  • Define the states from Start to End of the workflow.
    • Drag approval element from Toolbox on the left to the Designer pane on the right.
    • Connect the bottom of Start state with top of the Approval element.
    • Connect the bottom of Approval element to the top of End state.
  • Resolve any errors and warnings by setting workflow and approval element properties.
  • Activate it.
customer-approval-workflow
16. Test the workflow. You should be able to see the workflow bar.
customer-approval-workflow

Thursday, 6 October 2016

Upgrade Process


Upgrade Process

Following are the steps in order to upgrade AX 2009 to 2012


Preprocessing upgrade checklist
   ↓
AOD code upgrade checklist
   ↓
Model code upgrade checklist
   ↓
Data upgrade checklist
  Source System steps:
Prerequisite  Steps

1.Verify that you have the proper amount of space on your source and target system hard drive and in your database transaction log.
2. Ensure that Microsoft SQL Server is configured for the highest possible performance and throughput.
3. Clean up Data
4. Activate multisite functionality for each and every company when you upgrade from Microsoft Dynamics AX 2009 to Microsoft Dynamics AX 2012 before installing Upgrade  XPO . (For activate follow the path Administration  > Setup ->System > Multisite activation) 
5. Trade and Logistics licenses after you upgrade if configuration key enabled for source system.
6. Before you upgrade, if you are using virtual companies you must make the following changes to their configuration:  Make sure that the inventory dimensions table is not shared.  Make sure that tables that contain inventory dimension fields are not shared.
7.You will import the preprocessing XPO into the USR layer on the Microsoft Dynamics AX source system.
8. Be sure to back up your application files (*.aod) and label files (*.ald) before you import the preprocessing XPO
9. It is advisable to make sure that the Application Object Directory (AOD) is synchronized with the Microsoft Dynamics AX database schema before you begin to import of the XPO.
10.Install ALD files which are in DatabaseUpgrade\ALD path to C:\Program Files\Microsoft Dynamics AX\50\Application\Appl\Standard\ (Stop services before copy ALD file)
11.Import XPOs which  are in DatabaseUpgrade\XPO path(clear with id check box option at the time of import)
Prerequisite Steps for Target System
1.  Create a folder with name Old which is used to store AOD files in AX 2012in the folowing location %programFiles%\Microsoft DynamicsAX\60\Server\<AOSInstance Name>\bin\Application\Appl\standard
2. Copy all the AOD files in Old folder even for Microsoft Layer
3.If you have customized in folowing layer than rename with new one
      axbup.aod->axisp.aod,axbus.aod->axisv.aod,axsl3.aod->axslp.aod,axsl2.aod->axsln.aod,
axsl1.aod->axfpp.aod,axhfx.aod->axfpk.aod


Steps on Target System:

1. Open check list and path is /System Administrator/Setup/Code Upgrade check list
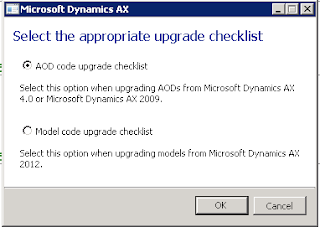


AOD code upgrade check list redio button is used for upgrade from AX 4.0 or AX 2009 to AX 2012 and Model code upgrade check list is used when source and target both are in AX 2012
2. Once click on ok it redirected to folowing check list
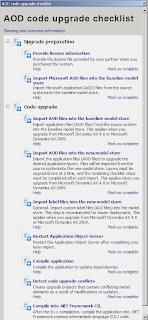


3. For compliting above check list we have to complete following steps
4. Click on Import Microsoft AOD files into the base line model store and import AOD files starting form lower layers(from SYS) to upper layer one by one
5. Click on Import AOD files into base line model store and select lowest layerfirst which you want to upgrade
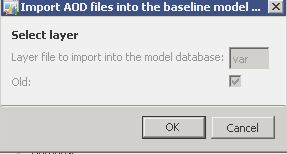

       6.Copy AOD files that you want to upgrade in the folowing location
          %ProgramFiles%\Microsoft Dynamics AX\60\Server\<AOS instance name>\bin\Application\Appl\Standard
Note:Do not copy Microsoft layers AOD in above locationand follow layer rename convention if you customized in the layer which does not exist in target system as discussed above in prerequisite for target system
7.Click on import AOD files into new model stores(make sure that model did not create already otherwise you have to delete model first then import model which you want to upgrate )
8.if you have't object in user layer then don't import user model since it hase all xpo in it .
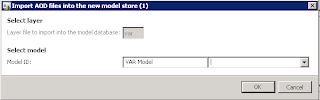


 9.Restart AOS after importing each model
10. Import label files
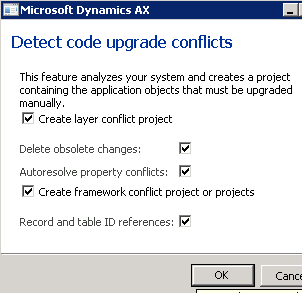
11.Click on Detect code upgrade conflicts on check list and checked check box Record and table ID referencdes as shown in folowing figure

Note: How to untall a model
 A. open command promt and navigate directory %ProgramFiles%\Microsoft Dynamics AX\60\ManagementUtilities
 B. Type  axutil delete /model:<name>
 C. Press enter
Start Preprocessing check list

You install the framework for the Preprocessing upgrade checklist in the USR layer of the Microsoft Dynamics AX source system by importing an XPO file.

To start checklist Expand Shared Project and locate Ax50PreUpgradeFramework,  Right-click it, and click Open.
and run menu item SysCheckList_PreUpgrade50

Process flow to Execute check list on source System


1.      Prepare for upgrade
Check upgrade readiness
 View and fix upgrade readiness issues
Initialize preprocessing)

                 ↓
2.      Prepare application data for preprocessing

System parameters
 Set up number sequence for upgrade
 Company priority setup
 Update country/region codes
 Map country/region codes
 Default country/region
 Prepare financial dimension framework for upgrade
 Map fixed asset calendars
 Prepare currencies for upgrade
 Inventory dimension group upgrade
 Product upgrade (preprocessing)
 Configure site structure
 Map task groups to capabilities
 Product Builder Route
 nodes upgrade 
 Units
 Unit conversions
 Fixed units
 Unit texts
 About purchase order upgrade
 User relations upgrade - invalid company users
 User relations upgrade missing contact person
 User relations upgrade duplicate user IDs
Select which employee number to upgrade

     ↓
     3. Preprocess data on live system
 Run live preprocessing scripts
 Country/region upgrade
 Party upgrade
 Run delta preprocessing scripts

                        ↓
4.      Preprocess data in single-user mode

Enter into single-user mode
 Run single-user mode preprocessing scripts

8 Common Errors in Dual-write

502 Bad Gateway : when the target application is not ready to handle the incoming request  401 Unauthorized / 403 Forbidden: This error occ...