Monday, 19 October 2020

Microsoft Flow

 Reference: https://dynamics365.wordpress.com/tag/common-data-model/


Along with the Common Data Model and Microsoft PowerApps, another significant component of Dynamics 365 is the new cloud based event automation service from Microsoft called as “Microsoft Flow”. Microsoft flow is basically an task/process/event  automation service, that allows to execute certain event (Such as sending an email notification, Creating a new record, saving/sharing files and more) when another event happens (Such as a new record is added to Common data model, a record is modified, a new person follows you on twitter and more).

Flow & CDM

You can learn more about Microsoft Flow Here.

In today’s post, we will see how you can take advantage of Microsoft Flow and automate several events between Common Data Model and other components of Dynamics 365 which are Dynamics CRM, Dynamics AX ERP, Project Madeira and others. In the current release of Microsoft Flow, only Dynamics CRM online is available for event automation, but when Dynamics 365 releases in future, you will start seeing other components such as Dynamics AX, Project Madeira and more.

In this walk through, i would have liked more to show how we can automate the process of “Creating a new Opportunity record in Dynamics CRM online, when a new opportunity record is added into the Common data model”. But I am having an intermittent issue connecting my CRM sandbox environment to Microsoft Flow. So, i will alter the flow a little bit and will send an email notification instead to myself, when a new opportunity record is added in the common data model.

With that said, let us go ahead and create this flow. Follow the steps below.

  • Login tot Microsoft Flow using your Office 365 credentials at the below URL. https://flow.microsoft.com/en-us/.
  • At this point, you can create your flow from  a template or create it from blank. I will create the flow from blank.

Create Flow from Blank

  • The next step is to set the initial trigger which will kick off the event (Which in this case is sending an email notification). So i will select the trigger “Common Data Model – Object is created”. Notice that you have several triggers from Microsoft applications and services, as well as for several 3rd party apps. This list of triggers ois going to grow over the period of time adding more capabilities.

Select Object CDM

  • Now I need to select my database name in the common data model. I have already configured my database in common data model and will consume the same in this walk through. After selecting the database, i will also need to select the Entity name, which is “Opportunity” in this case, since i want to create my flow using this.

Entity Name and Database

  • We will now setup the Next step by clicking the New Step button. Notice that you will see various options here such as “Add an action”, “Add a condition”, “Add a loop” and more. In this case, i will select Add an action.

Add new step

  • My preferred action if my CRM Sandbox environment did not have the issue would have been to add the new opportunity record in it. You can see in screenshot below that i have highlighted the action.
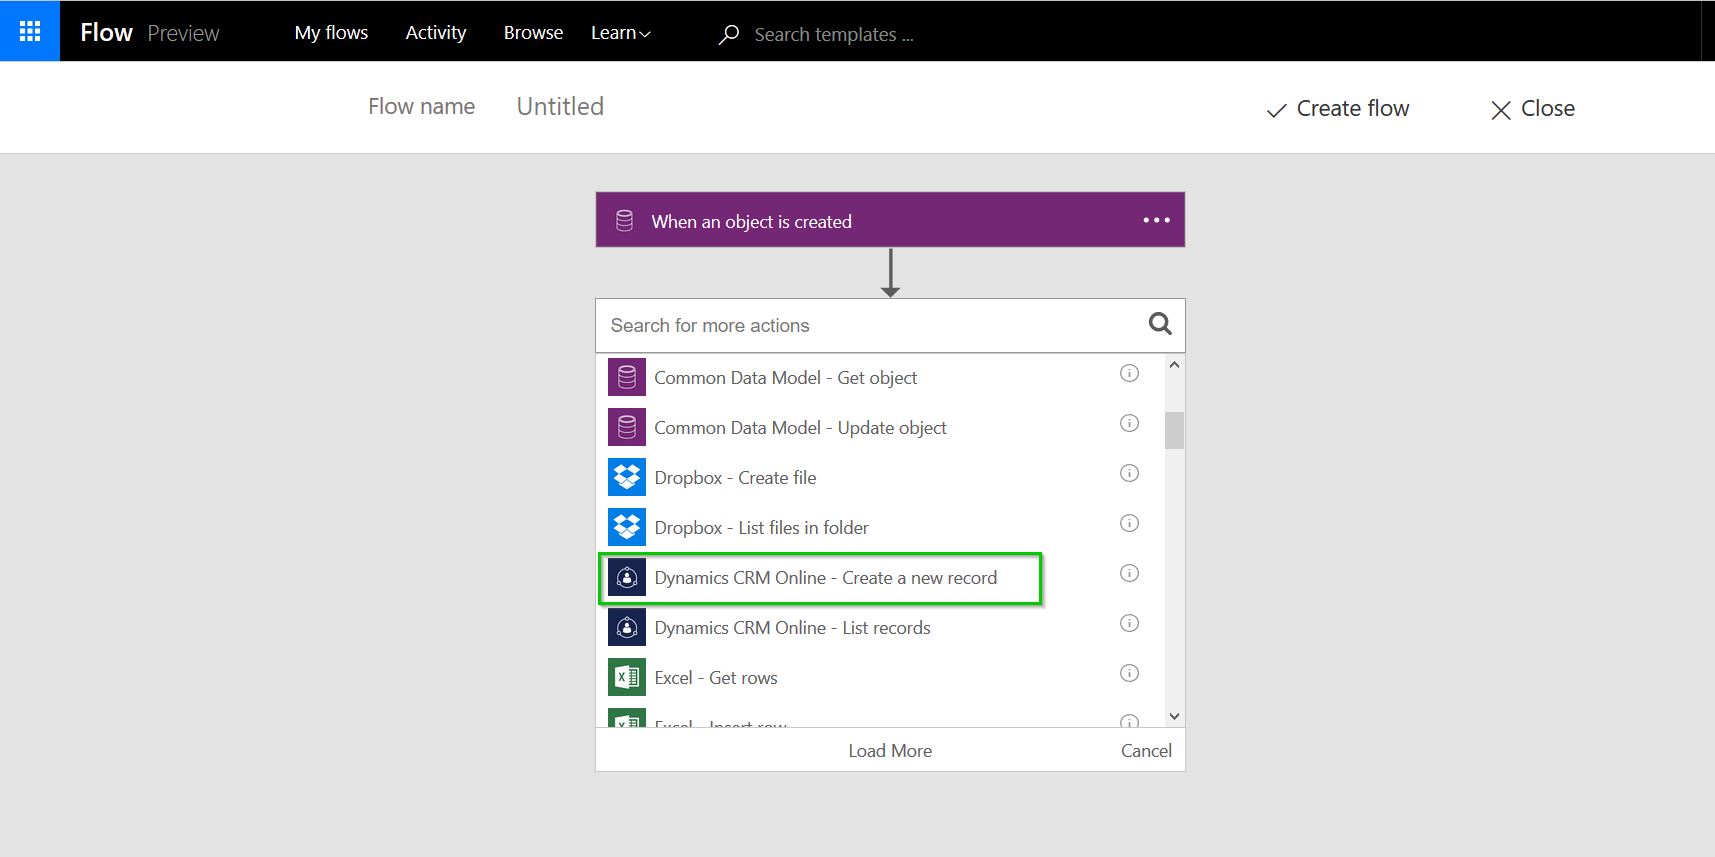
Action CRM Online

Since my CRM environment has the intermittent issue and i cannot connect it to my flow, i will use another action, which is to send an email notification to myself informing that a new opportunity record is added to the CDM.

Action O365 Send Email

  • The next step is to specify the email ID, subject and the body of the email notification. Screenshot below shows how you can set these up. Notice that you can make the email notification more detailed by adding the data fields in real time from the Opportunity entity into the email notification. For this walk through i will just use the basic one. You can even click the Advanced options to make the email notification more sophisticated with attachments, Cc, Bcc etc.

E-Mail Details

  • At this point, you can add as many steps/conditions/actions/loops as you want based on your flow’s requirement. In this case since the flow i wanted to created, i will provide a title for the flow and click Create flow and then click Done.

Save Flow

  • That is it! Our flow is now ready and we will now go see this in effect. To do this, we will open the Common Data Model and add a new Opportunity record in the Opportunity master. There are multiple ways of inserting the data into CDM, I will do this by connecting to my CDM database and opening the Opportunity entity in Excel and publish the new record from Excel back to the CDM.

Open CDM in Excel

Publish Opp to CDM

  • As soon as I click Publish and the record gets created in CDM, I got the email notification as per the setup we did in the flow. If I had my desired action setup, then it would have created a new opportunity record in Dynamics CRM online.

\Email Notification

Common Data Service (CDS)

 Integration between Dynamics 365 For Sales and Dynamics 365 For Finance & Operations

  • Reference: https://www.velosio.com/blog/2017/09/19/the-common-a-for-sales-and-dynamics-365-for-finance-operations/
  • Common data Services for integrating business apps seamlessly.
  • Microsoft PowerApps to build mobile apps and extend business processes easily with minimal or no coding needed .
  • Microsoft Flow to automate routing, approvals, event based actions and notifications etc.
  • Power BI for incredibly stunning data visualizations and data intelligence.
  • Microsoft Azure technology stack, such as Azure functions, Artificial intelligence, Machine learning and much more.

Probably, no other business application platform provides this breadth of technology and functionality that Microsoft Dynamics 365 provides today.

In my last post, I explained the Common Data Service and the capabilities, what is coming etc. In this post today, I will share some of my findings of testing of Prospect to Cash integration scenarios between D365 Sales and D365 Finance & Operations.

One of the most common requirements of every ERP implementation is the integration of the Sales and marketing application with the Finance and operations application, to exchange business data such as Customer accounts, contacts, quotations, sales orders, products, invoices and more, so that the respective team members from different teams can get a 360 degree view of the customer’s data. The Microsoft Common data service aims to make it possible to integrate Dynamics 365 For Sales and Dynamics 365 For Finance and Operations out of the box, with various data project templates readily available for use.

Why Common Data Service?

You may argue why use Common Data Service to build integration between the apps/services  Vs. just leveraging OData Service or even Customer services (REST/JSON). Sure, you can always leverage either OData Service or the Custom Services to build your integrations between Dynamics 365 for Finance and Operations with other Dynamics 365 or other 3rd party services if you feel more comfortable with that approach. However, leveraging the CDS will give you advantages such as, voiding significant investments in writing custom integration that you need to maintain at a cost. Additionally surfacing business data from multiple business applications of your organization into CDS provides you the capability to create mission critical business intelligence using Power BI or even build custom apps with ease leveraging PowerApps.

Connection Sets in CDS:

Connection Sets defines what apps/services/systems you are going to connect for data exchange.

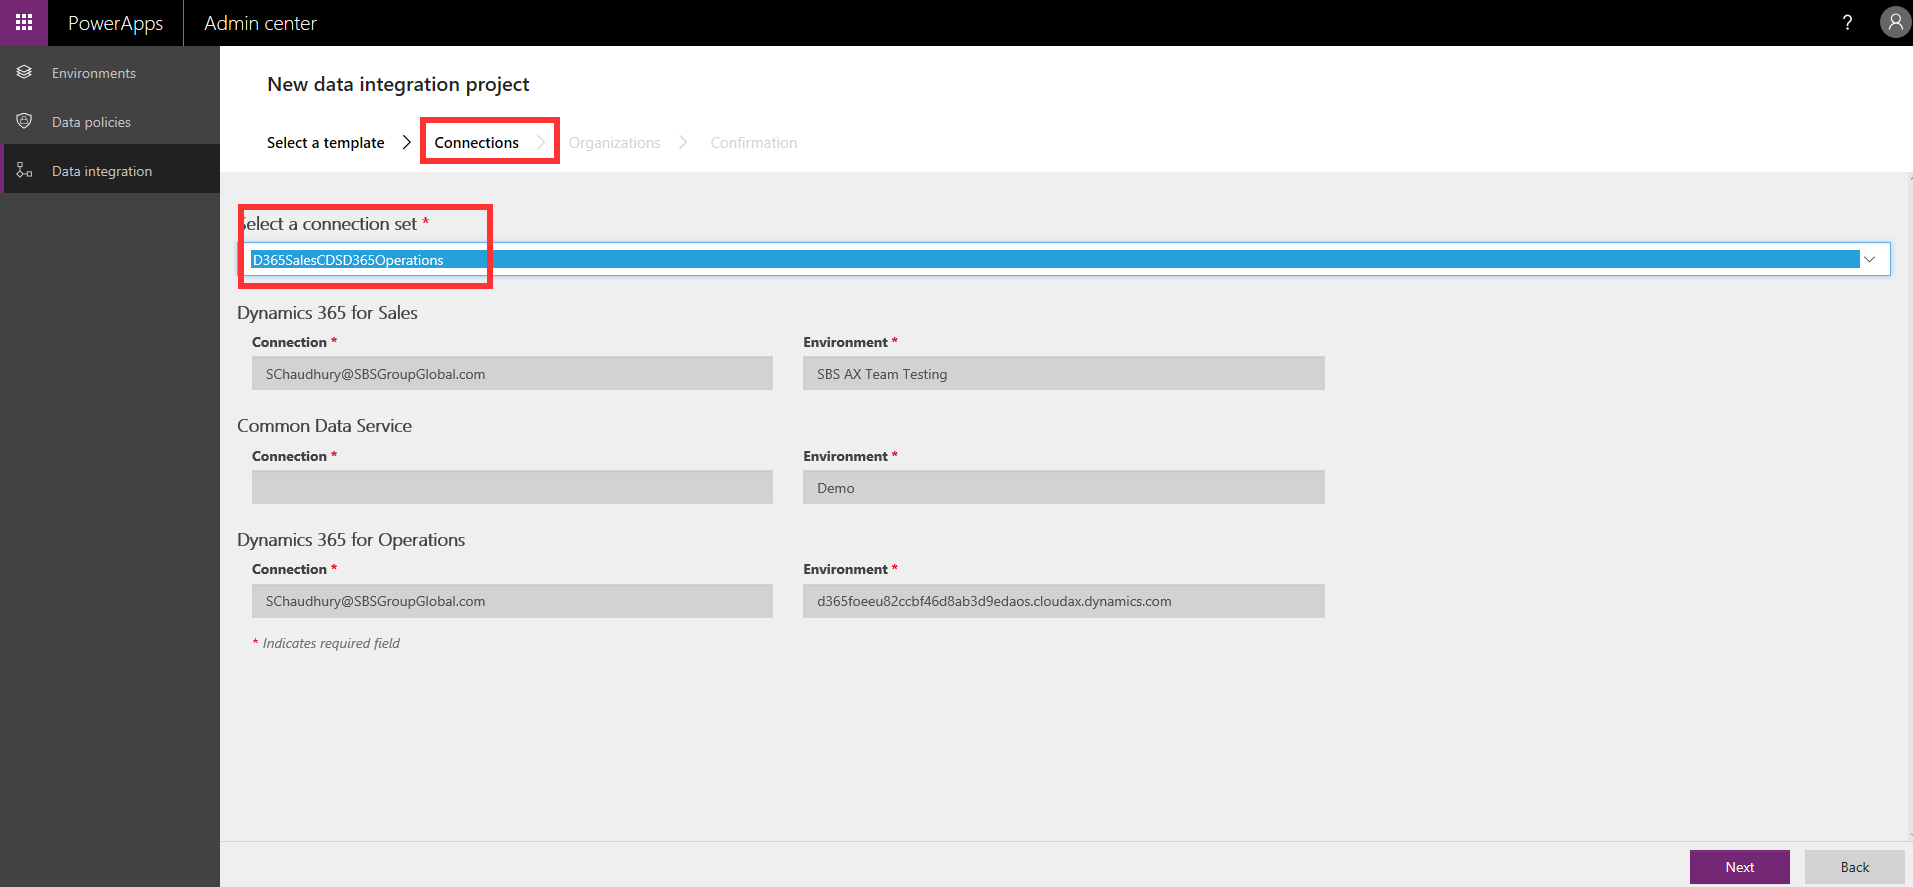
In PowerApps Admin center, I have already created my Connection Set, that establishes connection between my D365 For Sales and D365 For Finance and Operations apps. I also have done the Organization(s) mapping between these two apps, so that my data will surface in the required entities/organizations. Screenshot below shows the Connection set I have established. This is the first thing you need to setup, before you actually setup the data integration projects.

Connection Set

Data Integration projects in CDS: 

The Data integration projects defines what entities are being integrated/synced between the two apps defined in the Connection set. It contains the following information.

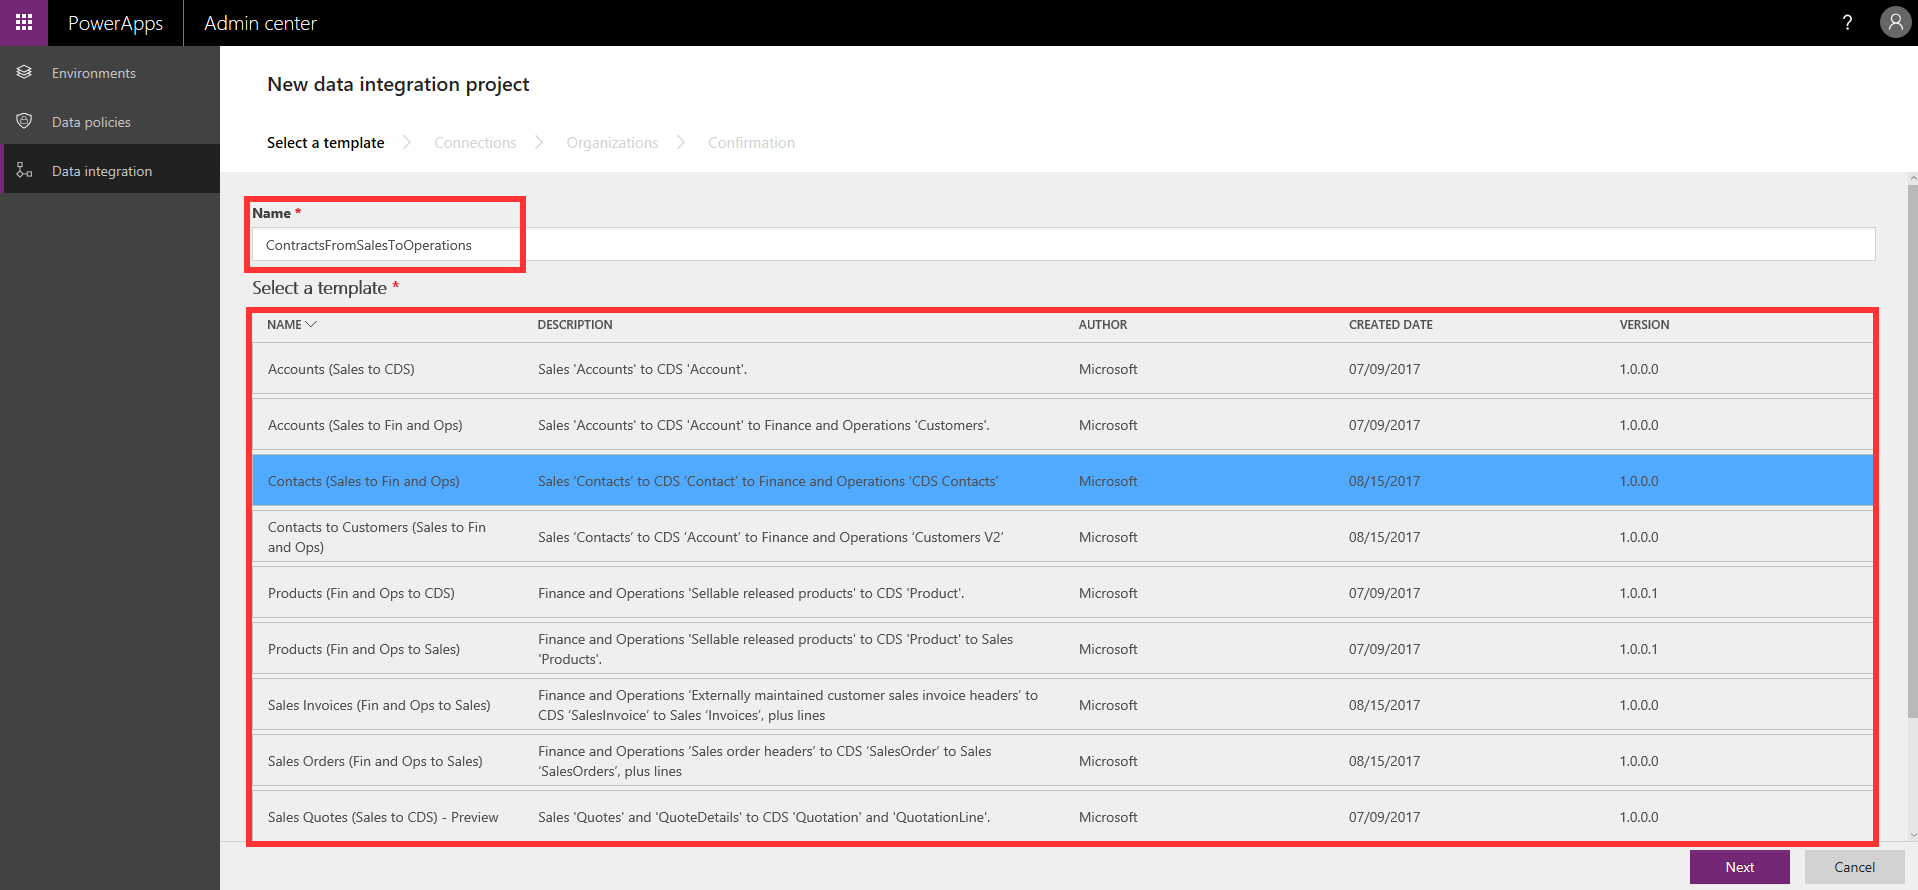
  • A template of the project (Predefined list of Data integration projects provided by Microsoft). Note: Currently, when you create a new data integration project, you are required to select a predefined template. This might change in future, where you can create your own mapping.

DataIntegrationProjects

  • Connection Set: Select the connection set you want to use within the data integrator project.

ConnectionSetInDataIntegrator

  • Organization Mapping: Since you could define more than one organization mapping within one connection set, you will can select a organization mapping that is applicable for the data integrator project.

DataIntegratorOrgMapping

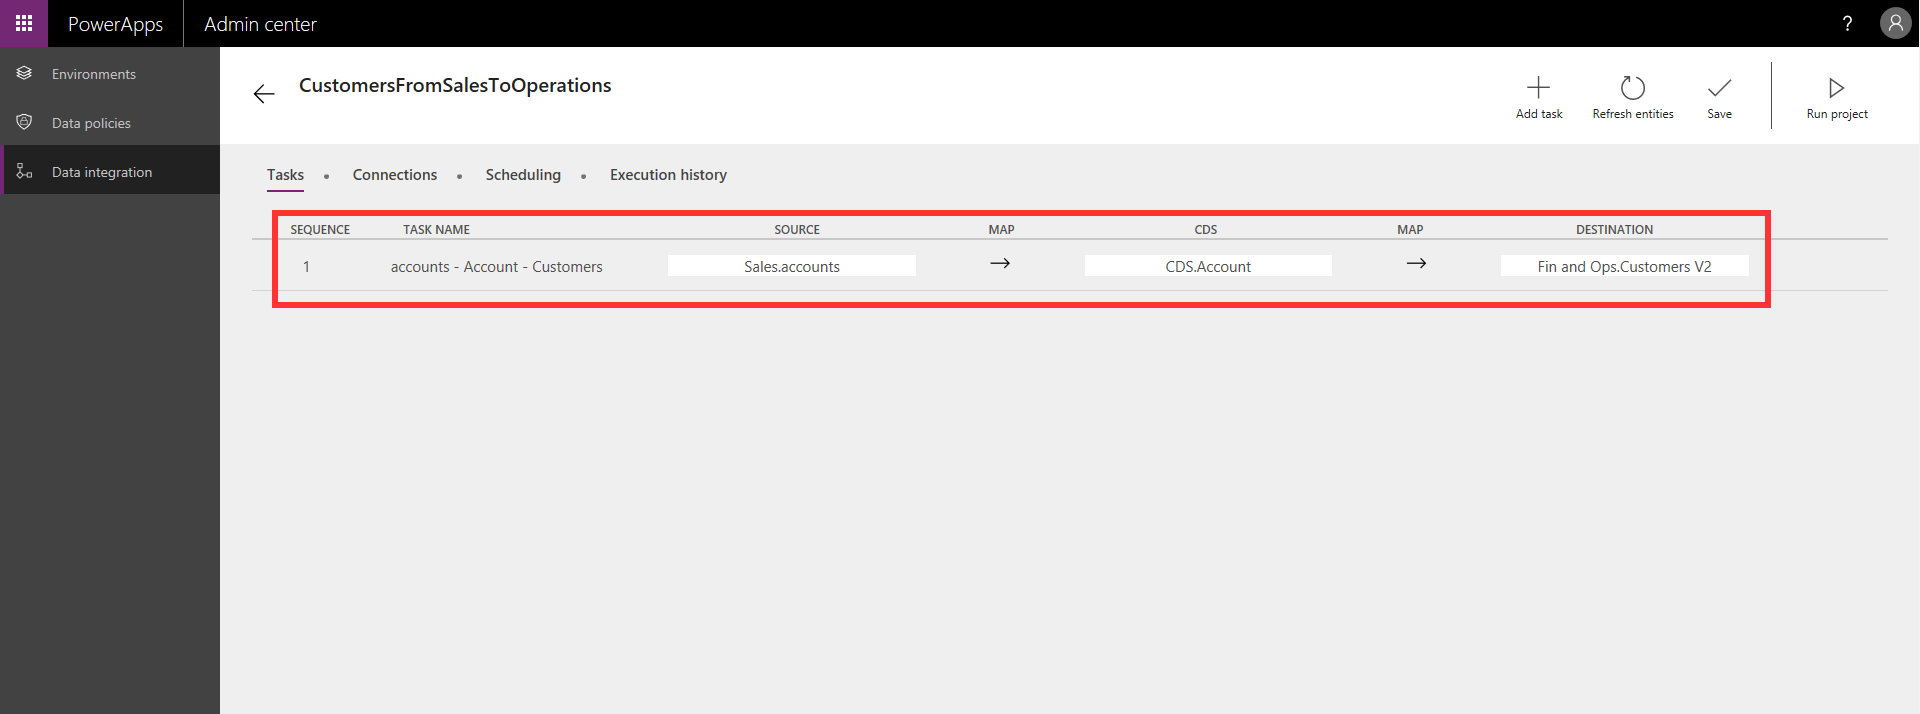
  • Tasks: The data from the source app (D365 For Sales ) flows through the Common Data Service(CDS) to the Destination app(D365 For Operations). The tasks under the project contains the individual data field mapping between the entities in source app, CDS and destination app. It also contains the information such as how frequently the project should run (Manually Vs in Batch).

TaskDataMapping

DataIntegrationProjectRunSchedule

DataMapping

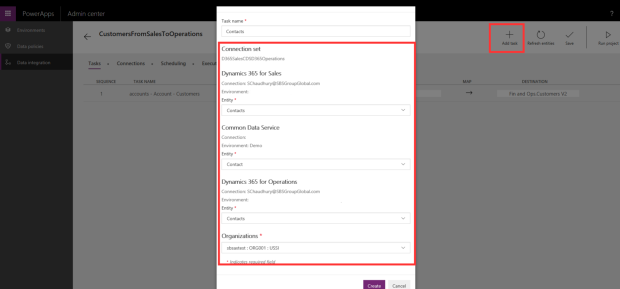
A default task comes automatically when you use a template to create a data integrator project, however, you can add your own tasks to the project, where you can map additional entities.

NewTaskUnderProjectCDS


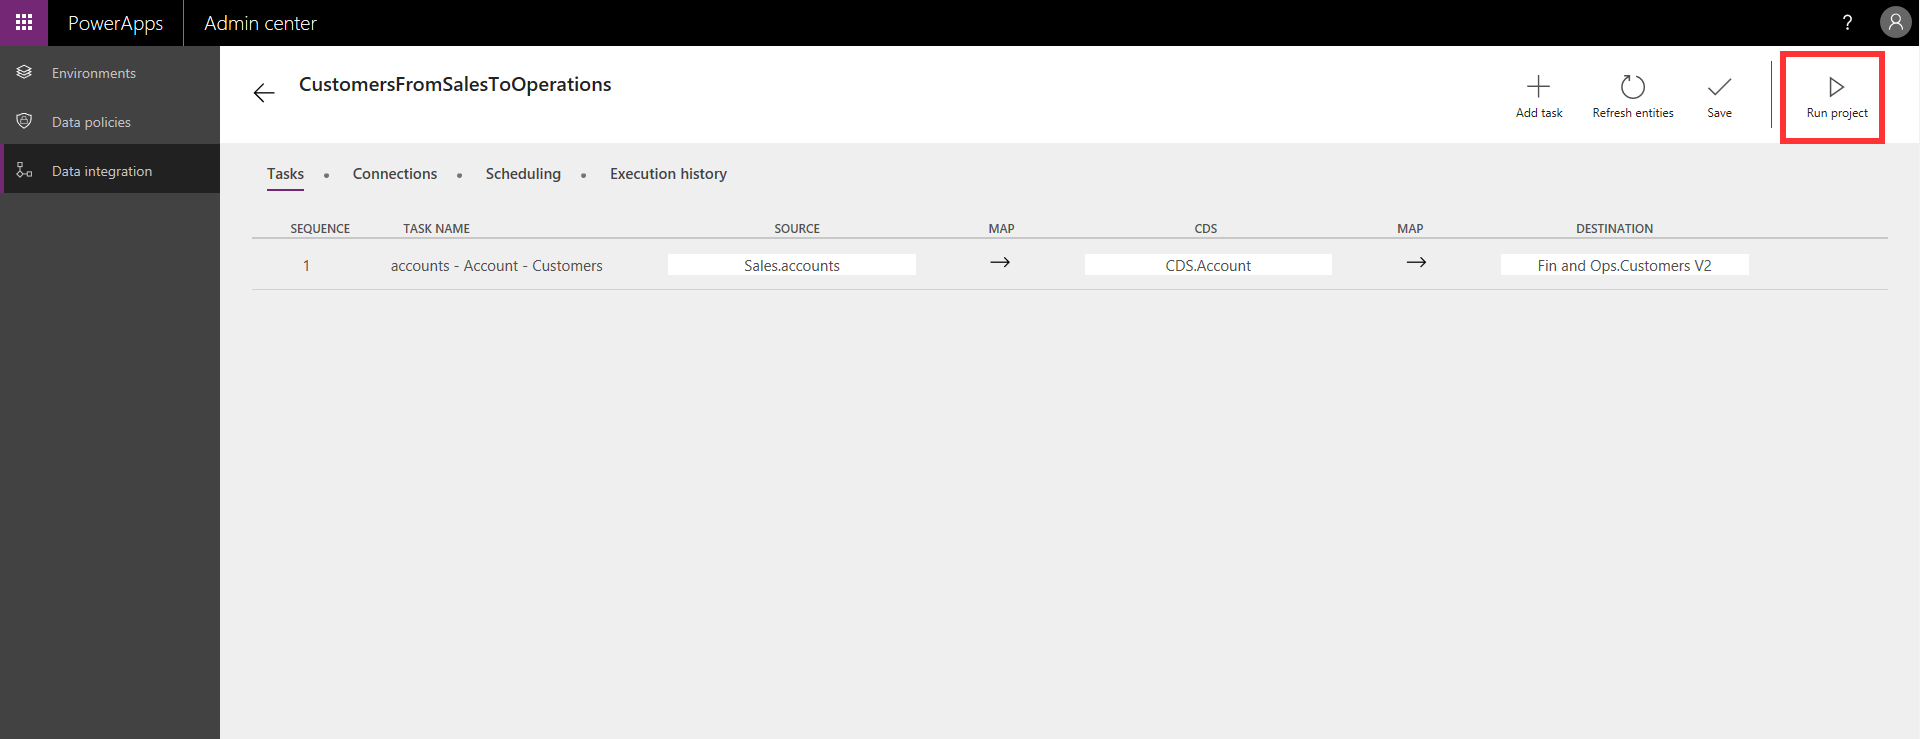
Now that the Data Integrator Project and the Connection sets are configured, let us see how the Customer account data automatically flows from D365 Sales to CDS and then from CDS to D365 For Operations. In this case, I will just run the project manually ( I could set it to run automatically also)

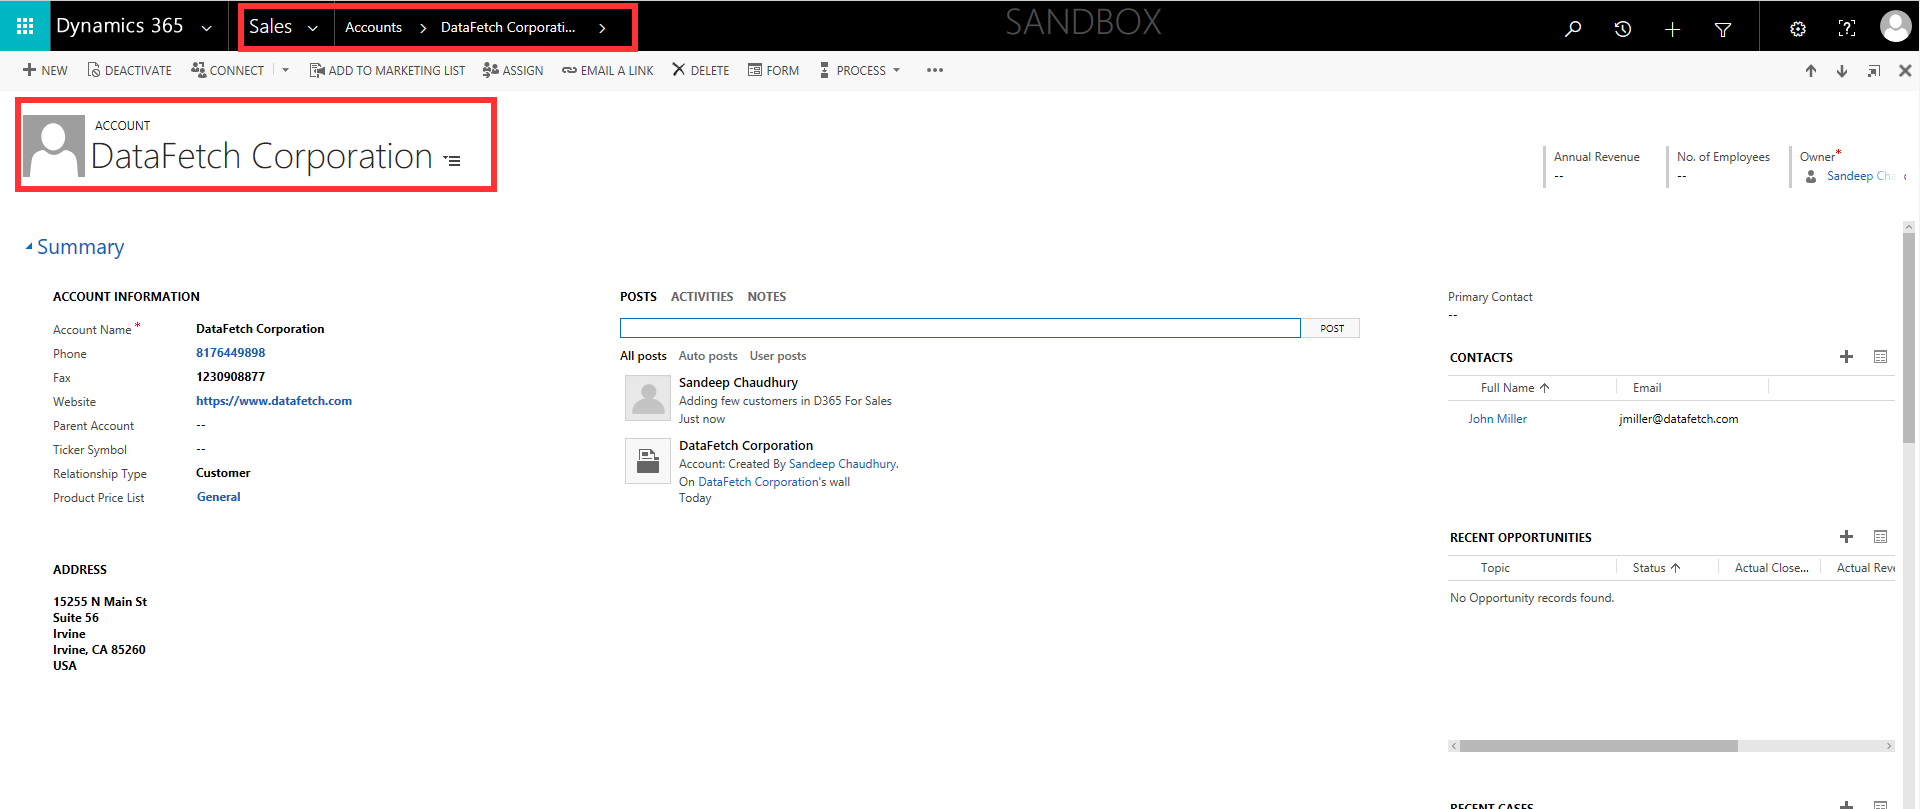
Below screenshot shows the new customer I have setup in D365 For Sales.

NewCustomerInD365FroSales

I ran the data integrator project now manually in CDS admin center. In an ideal scenario, you would set it up to run automatically.

RunDataProject

When the project run successfully , you can see the detailed execution history which will tell that the data got successfully transmitted from source to destination (D365 Sales to D365 For Operations in this case). See screenshots below. This execution log helps you identify issues with data sync if any and take necessary actions.

Execution History1

Execution History2

Now that the execution happened successfully, let us go verify if the Customer account got successfully created in D365 For Operations.

D365CustomerAccount1

D365CustomerAccount2

This was my testing just for one scenario of passing Customer account data from D365 from Sales to Operations for this blog post. There are other templates that addresses the full picture of Prospect to cash scenario(See screenshot below) such as syncing,

  • Contacts from Sales to Operations
  • Products Operations to Sales”,
  • Quotes from Sales to Operations
  • Sales orders from Sales to Operations
  • Sales Invoice details from Operations to Sales.

IntegrationTemplates

Thursday, 15 October 2020

security role in D365 FO & Forms

Part: 1 Create security role in D365

In D365 Finance and Operations when you need to provide and restrict users from a certain operation you can make use of security roles. You can create security roles from Finance and operations environment itself or from its development tool i.e Visual Studio. In this blog, we are going to create a security role in Visual Studio as follows.


  1. Create privilege 
     
    First of all we need to create privilege as follows
    now we need to add new entry point and set  object type in our case display menu item from properties
    Now add object name(display menu item  name) as follows
     
  2. create role
     
    Now we need to create role where above created privilege will be needed create new security role  as follows
    now we need to add new privilege in role as shown

    And from properties select privilege which we have created in previous step

  3. Create Duty
     
    Now we have to create new duty and assign previously created privilege in its properties as shown
  4. Now we can see security role in FnO environment
    select any user from system administration>>users and click on assign role as follows
    and now search for priviously created role and click on Ok button
    now your security role is assigned to user with our role will be able to see the object like form, report etc except user with system administrator.

 PART 2 : Assigning to FORMS


In some of the cases instead of providing security to whole form we need it for particular form control.So this blog will help you with providing access to form control via security roles.If you want to know more about security roles you can use my previous blog .
  1. First of all we need form control where we need to set some of the properties as follows. In our case we are using laid off button as shownNow select the button and press F4 for its properties and set needed permision to manual as follows
  2. Now in your desired security privilege you can either directly set form control permissions or Entry Points.For form control permission method right click on form control permission and select new form and after that set name property to your desired form (Hcmworker in our case) as follows

    Now right click on your form and select New control option as follows and set control name and permission for it as follows

    For Entry point method you need first need to add new entry point and set its object type and object name properties or for existing ones select desired entry point and click on drop down arrow and on controls right click and select new control.And now set its grant and name properties to desired control and its access rights

  3. After this you need to assign this privilege in desired security role and security duty as previously discussed in security role blog

Monday, 27 July 2020

Customization Analysis Report (CAR Report)- D365 through - xppbp.exe

The CAR Customization Analysis Report is a Microsoft Excel report.This report contains details of your customizations & artifacts, extension models, best practices issues, errors & warnings.

xppbp.exe: The use is very simple via an executable named xppbp.exe that is located either in C:\Packages\Bin\ (locally deployed VM) or I:\AosService\PackagesLocalDirectory\bin (Azure-deployed VM).

Syntax

The syntax is as follows

xppbp.exe -metadata="LocalPackagesFolder" -all -model="ModelName" -xmlLog="LogLocation" -module="PackageName" -car="ReportLocation"

You run it via command prompt (cmd.exe).

Examples

Be aware you need to execute this per model you have in your solution. For a model ApplicationSuite.XLTY you included in ApplicationSuite the call could look like this

xppbp.exe -metadata=C:\Packages -all -model="ApplicationSuite.XLTY" -xmlLog=C:\Temp\BPCheckLog_XltySuite.xml -module="ApplicationSuite" -car=C:\Temp\CustomizationAnalysisReport_XltySuite.xlsx

Assuming there is a model in Foundation, too, you would want to execute

xppbp.exe -metadata=C:\Packages -all -model="ApplicationFoundation.XLTY" -xmlLog=C:\Temp\BPCheckLog_XltyFoundation.xml -module="ApplicationFoundation" -car=C:\Temp\CustomizationAnalysisReport_XltyFoundation.xlsx

Report

The outcome of the analysis is a Microsoft Excel file that is quite similar to what you are used to from AX 2012.
AX7 Customization Analysis Report

Saturday, 4 July 2020

Get InventSite Address from InventSite ID in AX 2012

Primary address stored for inventSite 


The following job takes inventsiteID and returns the delivery address specified in the invent site. Hope it will help someone.

static void addressTest(Args _args)
{
    InventSite site = InventSite::find("S02");
    LogisticsPostalAddress address = LogisticsLocationEntity::findPostalAddress(site, LogisticsLocationRoleType::None);
    info(address.Address);
}


Phone Details

private Phone getSitePhone(InventSiteId _inventSiteID)
{
    InventSite site = InventSite::find(_inventsiteID);
    LogisticsElectronicAddress  logisticsElectronicAddress;
    LogisticsLocationEntity locationEntity = LogisticsLocationEntity::findLocation(site, LogisticsLocationRoleType::Delivery, DirUtility::getCurrentDateTime(),true);
    RecId parentRecID= locationEntity.parmLocationRecId();
   LogisticsLocation           logisticsLocation;
   if (parentRecID )
   {
      select logisticsLocation
           where  logisticsLocation.ParentLocation == parentRecID
           join logisticsElectronicAddress
               where logisticsElectronicAddress.Type     == LogisticsElectronicAddressMethodType::Phone &&
                   logisticsElectronicAddress.location == logisticsLocation.RecId;
   }
   return logisticsElectronicAddress.Locator;
}

8 Common Errors in Dual-write

502 Bad Gateway : when the target application is not ready to handle the incoming request  401 Unauthorized / 403 Forbidden: This error occ...